Creating Plugins for the Cockpit User Interface
Note: This post was updated in Aug 2022 to adjust to reflect Cockpit UI and development best practices.
Cockpit is a web-based graphical interface for servers. You can easily add your own custom pages to the navigation.
For this tutorial you need to install your distribution’s cockpit packages or build it from git.
We’ll make a package called pinger that checks whether your server has network connectivity to the Internet by pinging another host. It’s simple and not too fancy. The package will spawn a process on the server to do all the work.
This example package is already included in the Cockpit sources. You can look it over and modify it.
To start, let’s get ready for development by launching a terminal on your local computer.
First, create a project directory and download the example:
mkdir pinger; cd pinger
curl -O https://raw.githubusercontent.com/cockpit-project/cockpit/master/examples/pinger/manifest.json
curl -O https://raw.githubusercontent.com/cockpit-project/cockpit/master/examples/pinger/ping.html
curl -O https://raw.githubusercontent.com/cockpit-project/cockpit/master/examples/pinger/pinger.js
Cockpit pages — more specifically their HTML and Javascript files — live in package directories. In the package directory there’s also a manifest.json file which tells Cockpit about the package. The pinger directory above is such a package. Its manifest.json file looks like this:
{
    "version": 0,
    "tools": {
        "pinger": {
            "label": "Pinger",
            "path": "ping.html"
        }
    }
}
The manifest above has a "tools" subsection, which means that it will appear in the lower section of the menu (see the manifest documentation for details). Each tool is listed in the menu by Cockpit. The "path" is the name of the HTML file that implements the tool, and the "label" is the text to show in the menu.
You’ll notice that we haven’t told Cockpit about how to find the package yet. To do so you either copy or symlink the package into one of two places:
~/.local/share/cockpitin your home directory. It’s used for user specific packages and ones that you’re developing. You can edit these on the fly and refresh your browser to see changes./usr/share/cockpitis the location for installed packages available to all users of a system. Changing files in this path requires administrator (“root”) privileges. These should not be changed while Cockpit is running.
Since we’re going to be actively editing this package, let’s symlink it into the first location, in your home directory.
mkdir -p ~/.local/share/cockpit
ln -snf $PWD ~/.local/share/cockpit/pinger
To list the Cockpit packages which are installed, use the following command:
$ cockpit-bridge --packages
...
pinger: /home/.../.local/share/cockpit/pinger
...
You should see pinger listed among all the active modules, like the above example.
Log into Cockpit on this machine with your current user name, as the package is installed in your home directory. (If you’re already logged in to Cockpit with your user account, you can simply reload your browser.)
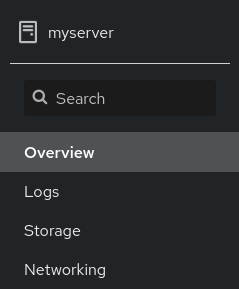
You should now see a new item:
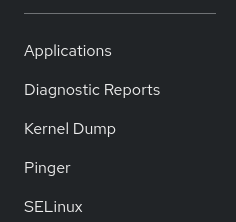
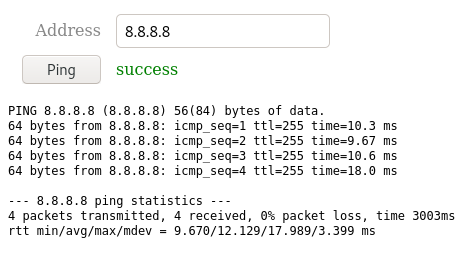
The pinger tool itself looks like this:
Lets take a look at the pinger HTML, and see how it works.
<!DOCTYPE html>
<html>
<head>
    <title>Pinger</title>
    <meta charset="utf-8">
    <script src="../base1/cockpit.js"></script>
</head>
<body>
    <main tabindex="-1">
        <section>
            <div>
                <div>
                    <label for="address">Address</label>
                    <input id="address" value="8.8.8.8">
                </div>
                <div>
                    <button id="ping">Ping</button>
                    <span id="result"></span>
                </div>
                <div>
                    <pre id="output"></pre>
                </div>
            </div>
        </section>
    </main>

    <script src="pinger.js"></script>
</body>
</html>
Included in the <head> block: cockpit.js is the basic API for interacting with the system, as well as Cockpit itself. You can find detailed documentation in the Cockpit guide.
The HTML is pretty basic. It defines a little form with a field to type an address, a button to click to start pinging, and an area to present output and results.
The logic lives in pinger.js, shown in full here:
const address = document.getElementById("address");
const output = document.getElementById("output");
const result = document.getElementById("result");
const button = document.getElementById("ping");

function ping_run() {
    cockpit.spawn(["ping", "-c", "4", address.value])
        .stream(ping_output)
        .then(ping_success)
        .catch(ping_fail);

    result.innerHTML = "";
    output.innerHTML = "";
}

function ping_success() {
    result.style.color = "green";
    result.innerHTML = "success";
}

function ping_fail() {
    result.style.color = "red";
    result.innerHTML = "fail";
}

function ping_output(data) {
    output.append(document.createTextNode(data));
}

// Connect the button to starting the "ping" process
button.addEventListener("click", ping_run);

// Send a 'init' message.  This tells integration tests that we are ready to go
cockpit.transport.wait(function() { });
First we get a bunch of variables pointing to the HTML elements we want to interact with. Next we attach a handler to the Ping button so that the ping_run() function is called when it is clicked.
function ping_run() {
}
...
button.addEventListener("click", ping_run);
The ping_run() function is where the magic happens. cockpit.spawn lets you spawn processes on the server and interact with them via stdin and stdout.
Here we spawn the ping command with some arguments:
cockpit.spawn(["ping", "-c", "4", address.val()])
In a web browser you cannot block and wait until a method call completes. Anything that doesn’t happen instantaneously gets its results reported back to you by means of callback handlers.
JavaScript has a standard interface called a Promise. You add handlers by calling the .then() or .catch() methods and registering callbacks (Note: historically these have been called .done() and .fail(), but these should not be used any more in new code.) The cockpit.spawn specific .stream() handler registers a callback to be invoked whenever the process produces output.
   <some promise>
   .stream(ping_output)
   .then(ping_success)
   .catch(ping_fail);
}
The ping_success() and ping_fail() and ping_output() update the display as you would expect.
Warning: Don’t start long-running, uninterruptible processes in this naïve way. Browser tabs are easily closed, network connections get severed, laptops suspend, and so on. Take care to use a mechanism like systemd-run (or similar) for processes that should not be interrupted, such as installation procedures.
This should be enough to get you started with your first useful (but admittedly basic) Cockpit page! Please see the Contributing page for more documentation on where to grow from here.