Starter Kit - the turn-key template for your own pages
The bare minimum
Cockpit’s API makes it easy to create your own pages (or
“extensions” if you will) that appear in Cockpit’s menu and interact with your system in any way you like. Our pet
example is the Pinger which is just the bare
minimum: a HTML file with a form to
enter an IP, a small piece of JavaScript
to call the ping Linux command through Cockpit spawn()
and capture its output; and a
manifest file which tells
cockpit how to add it to the menu and where the entry point is.
There is a rather old blog post which explains the Pinger example in detail. Cockpit changed its visual design quite dramatically since then, Pinger’s JavaScript got split into a separate file and does not use jQuery any more, but aside from these details that post is still generally applicable.
Requirements for real projects
Pinger is great for explaining and understanding the gist of how Cockpit works. But an actual production-ready project requires a lot more:
-
Separation of HTML, CSS, and JavaScript code: This ensures that your code can use a safe Content-Security-Policy and does not have to use e. g.
unsafe-inline. We strongly recommend this for third-party pages, and absolutely require this for Cockpit’s own pages. -
Modern frameworks for creating page contents. For any non-trivial page you really don’t want to dabble with piecing together
myelement.innerHTML = …strings, but use something like React to build page contents and PatternFly so that your page fits into Cockpit’s design. -
Use Babel to write your code in modern ES6 JavaScript.
-
Use ESLint to spot functional and legibility errors in your code.
-
A build system like webpack to drive all of the above and build blobs (“minified Javascript in a single file”) that are efficiently consumable by browsers.
-
Building of release tarballs, source and binary RPMs for testing and distribution.
-
Tests to make sure your code keeps working, new features work on all supported operating systems, and changes (pull requests) get validated.
-
As a bonus, easy and safe testing of your page in a Vagrant virtual machine.
Sounds complex? It indeed is for someone who is not familiar with the ever-changing “modern” JavaScript world, and doesn’t want to learn the details of all of these before you can even begin working on your code. This is where the Starter Kit comes in!
Bootstrapping your way from zero to “works!”
The Cockpit Starter Kit is an example project which provides all of
the above requirements. It provides a simple
React page
that uses the cockpit.file() API to read /etc/hostname
and show it. There is also an accompanying
test that verifies this page. The
other files are mostly build system boilerplate, i. e. the things you don’t want to worry about as the first thing when
you start a project.
So, how to get this? Make sure you have the npm package installed. Then check out the repository and build it:
git clone https://github.com/cockpit-project/starter-kit.git
cd starter-kit
make
After that, install (or rather, symlink) the webpack-generated output page in dist/ to where cockpit can see it:
mkdir -p ~/.local/share/cockpit
ln -s `pwd`/dist ~/.local/share/cockpit/starter-kit
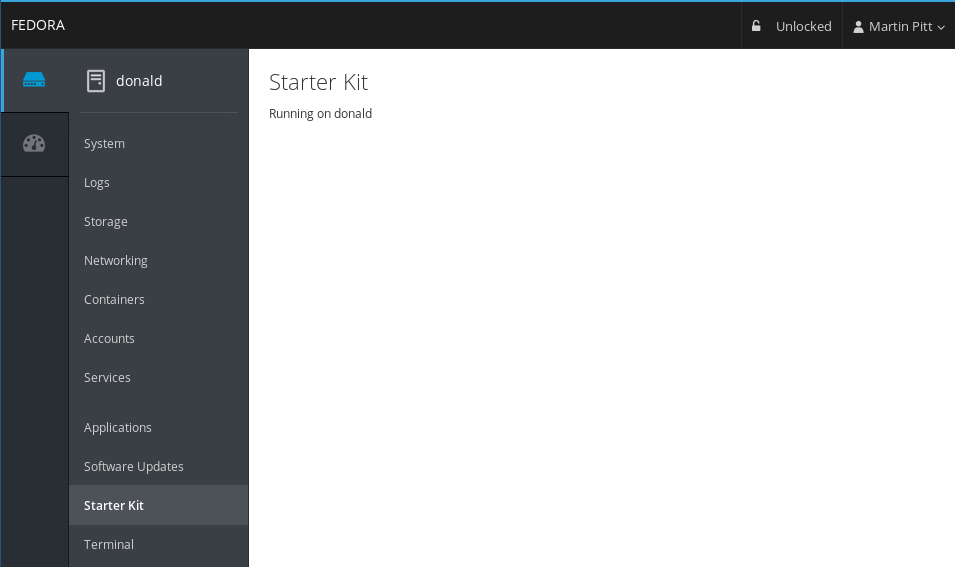
Now you should be able to log into https://localhost:9090 and see the “Starter Kit” menu entry:
The symlink into your source code checkout is a very convenient and efficient way of development as you can just type
make after changing code and directly see the effect in Cockpit after a page reload.
You should now play around with this a little by hacking src/starter-kit.jsx, running make, and reloading the page.
For example, try to read and show another file, run a program and show its output, or use
cockpit.file(“/etc/hostname”).watch(callback)
to react to changes of /etc/hostname and immediately update the page.
Testing
Untested code is broken code. If not here and now, then in the future or some other operating system. This is why Cockpit has a rather complex machinery of regularly building 26 (!) VM images ranging from RHEL-7 and Fedora 27 over various releases of Debian and Ubuntu to OpenShift and Windows 8, and running hundreds of integration tests on each of them for every PR in an OpenShift cluster.
Replicating this for other projects isn’t easy, and this has been one, if not the major reason why there aren’t many third-party Cockpit projects yet. So we now made it possible for third-party GitHub projects to use Cockpit’s CI environment, test VM images, and (independently) Cockpit’s browser test abstraction API.
starter-kit uses all three of those: When you run make check, it will:
- build an RPM out of your current code
- check out cockpit’s bots/ directory that has the current image symlinks and tools to download, customize and run VM images
- check out cockpit’s tests/common directory from a stable Cockpit release (as the API is not guaranteed to be stable) which provides a convenient Python API for the Chrome DevTools protocol
- download Cockpit’s current CentOS-7 VM image; you can test on a different operating system by setting the environment
variable
TEST_OS=fedora-27(or a different operating system - but note that starter-kit does not currently build debs) - create an overlay on that pristine centos-7 image with the operating system’s standard “cockpit” package and your locally built starter-kit RPM installed
- run a VM with that overlay image with libvirt and QEMU
- launch a chromium (or chromium-headless) browser
- Run the actual check-starter-kit test which instructs the web browser what to do and which assertions to make
[starter-kit] $ make check
[...]
rpmbuild -bb [...] cockpit-starter-kit.spec
[...]
git fetch --depth=1 https://github.com/cockpit-project/cockpit.git
From https://github.com/cockpit-project/cockpit
 * branch            HEAD       -> FETCH_HEAD
git checkout --force FETCH_HEAD -- bots/
[...]
bots/image-customize -v -r 'rpm -e cockpit-starter-kit || true' -i cockpit -i `pwd`/cockpit-starter-kit-*.noarch.rpm -s /home/martin/upstream/starter-kit/test/vm.install centos-7
[...]
TEST_AUDIT_NO_SELINUX=1 test/check-starter-kit
1..1
# ----------------------------------------------------------------------
# testBasic (__main__.TestStarterKit)
#

ok 1 testBasic (__main__.TestStarterKit) # duration: 21s
# TESTS PASSED [22s on donald]
Note that the first time you run this will take a long time due to the rather large VM image download. But it will be reused for further tests.
For writing your own tests with the Cockpit Python API, have a look at the Browser and MachineCase classes in
testlib.py. These provide both
low-level (like click() or key_press()) and high-level (like login_and_go()) methods for writing test cases. And
of course you have a wealth of Cockpit tests for
getting inspiration.
starter-kit itself is also covered by Cockpit’s CI, i. e. pull requests will run tests on CentOS 7 and Fedora 27 (example, click on “View Details”). Please come and talk to us once your project is mature enough to do the same, then we can enable automatic pull request testing on your project as well.
Using different technologies
starter-kit makes opinionated choices like using React, webpack, and Cockpit’s testing framework. These are the technologies that we use for developing Cockpit itself, so if you use them you have the best chance that the Cockpit team can help you with problems. Of course you are free to replace any of these, especially if you have already existing code/tests or a build system.
For example, it is straightforward to just use Cockpit’s test images with the image-customize tool and running these
as ephemeral VMs with testvm.py, but
not use Cockpit’s test/common. Tests can also be written with e. g. puppeteer
or nightmare. I will write about that separately.
Feedback
starter-kit is still fairly new, so there are for sure things that could work more robustly, easier, more flexibly, or just have better documentation. If you run into trouble, please don’t hesitate telling us about it, preferably by filing an issue.
Happy hacking!
The Cockpit Development Team