Deployment Guide
Documentation for Cockpit 357.
Latest version available here.
Manual pages
cockpit(1)
Name
cockpit - Cockpit
Description
Cockpit is a web accessible interactive admin interface for Linux
machines. Cockpit can usually be accessed on port 9090 of the
machine it’s installed on. Cockpit starts on demand. Use your system
credentials to log in.
Components
The cockpit-ws web service listens on port 9090 and is started
on demand by systemd. The Cockpit web service authenticates the
user, loads Cockpit into the browser, and starts cockpit-bridge in a
Linux user session.
The cockpit-bridge provides Cockpit in the web browser with access to the system APIs. It does this over its standard in and standard out. The bridge is started like a shell once per Linux user session.
Bugs
Please send bug reports to either the distribution bug tracker or the upstream bug tracker.
Author
Cockpit has been written by many contributors.
See also
cockpit-tls(8) , cockpit.bridge(1) , systemd(1), Cockpit guide
cockpit.conf(5)
Name
cockpit.conf - Cockpit configuration file
Description
Cockpit can be configured via /etc/cockpit/cockpit.conf. If $XDG_CONFIG_DIRS is set, then the first path containing a ../cockpit/cockpit.conf is used instead. Other configuration files and directories are searched for in the same way.
This file is not required and may need to be created manually. The file has a INI file syntax and thus contains key / value pairs, grouped into topical groups. See the examples below for details.
Note: The port that cockpit listens on cannot be changed in this file. To change the port change the systemd cockpit.socket file.
WebService
- Origins
-
By default cockpit will not accept crossdomain websocket connections. Use this setting to allow access from alternate domains. Origins should include scheme, host and port, if necessary. Wildcards and glob expressions are permitted. IPv6 addresses must have their brackets escaped with backslashes (e.g.
\[::1\]) as they are matched usingfnmatch().
[WebService]
Origins = https://somedomain1.com https://somedomain2.com:9090 https://*.somedomain3.com https://\[::1\]:9090- ProtocolHeader
-
Configure cockpit to look at the contents of this header to determine if a connection is using tls. This should only be used when cockpit is behind a reverse proxy, and care should be taken to make sure that incoming requests cannot set this header.
[WebService]
ProtocolHeader = X-Forwarded-Proto- ForwardedForHeader
-
Configure cockpit to look at the contents of this header to determine the real origin of a connection. This should only be used when cockpit is behind a reverse proxy, and care should be taken to make sure that incoming requests cannot set this header.
[WebService]
ForwardedForHeader = X-Forwarded-For- LoginTitle
-
Set the browser title for the login screen.
- LoginTo
-
When set to
truethe Connect to option on the login screen is visible and allows logging into another server. When set tofalse, direct remote logins are disallowed. If this option is not specified then it will be automatically detected based on whether the cockpit-bridge package is installed and the ssh program is available.
If cockpit-ws is exposed to the public internet, and also has access to a private internal network, it is recommended to explicitly set LoginTo=false. This prevents unauthenticated remote attackers from scanning the internal network for existing machines and open ports. - RequireHost
-
When set to
truecockpit will require users to use the Connect to option to specify the host to log into. - AllowMultiHost
-
When set to
true, cockpit will allow users to connect to multiple hosts in one session. The default is OS specific.
When connecting to multiple servers, JavaScript runs without isolation. All systems will be vulnerable to potential attacks from other connected hosts. Enable this option only when all hosts are trusted. - MaxStartups
-
Same as the sshd configuration option by the same name. Specifies the maximum number of concurrent login attempts allowed. Additional connections will be dropped until authentication succeeds or the connections are closed. Defaults to 10.
Alternatively, random early drop can be enabled by specifying the three colon separated values start:rate:full (e.g. "10:30:60"). Cockpit will start refusing authentication attempts with a probability of rate/100 (30%) if there are currently start (10) unauthenticated connections. The probability increases linearly and all connection attempts are refused if the number of unauthenticated connections reaches full (60). - AllowUnencrypted
-
If true, cockpit will accept unencrypted HTTP connections. Otherwise, it redirects all HTTP connections to HTTPS. Exceptions are connections from localhost and for certain URLs (like /ping). Defaults to false.
- UrlRoot
-
The root URL where you will be serving cockpit. When provided cockpit will expect all requests to be prefixed with the given url. This is mostly useful when you are using cockpit behind a reverse proxy, such as nginx.
/cockpit/and/cockpit+are reserved and should not be used. For example/cockpit-new/is ok./cockpit/and/cockpit+new/are not. - ClientCertAuthentication
-
If true, enable TLS client certificates for authenticating users. Commonly these are provided by a smart card, but it’s equally possible to import certificates directly into the web browser. Please see the Certificate/smart card authentication section in the Cockpit guide for details.
- Shell
-
The relative URL to top level component to display in Cockpit once logged in. Defaults to
/shell/index.html
Log
- Fatal
-
The kind of log messages in the bridge to treat as fatal. Separate multiple values with spaces. Relevant values are: criticals and warnings.
OAuth
Cockpit can be configured to support the implicit grant OAuth authorization flow. When successful the resulting oauth token will be passed to cockpit-ws using the Bearer auth-scheme. For a login to be successful, cockpit will also need a to be configured to verify and allow Bearer tokens.
- URL
-
This is the url that cockpit will redirect the users browser to when it needs to obtain an oauth token. Cockpit will add a redirect_uri parameter to the url with the location of where the oauth provider should redirect to once a token has been obtained.
- ErrorParam
-
When a oauth provider redirects a user back to cockpit, look for this parameter in the querystring or fragment portion of the url to find a error message. When not provided it will default to error_description
- TokenParam
-
When a oauth provider redirects a user back to cockpit, look for this parameter in the querystring or fragment portion of the url to find the access token. When not provided it will default to access_token
Session
- Banner
-
The contents of the specified file (commonly /etc/issue) are shown on the login page. By default, no banner is displayed.
- IdleTimeout
-
Time in minutes after which session expires and user is logged out if no user action has been performed in the given time. This idle timeout only applies to interactive password logins. With non-interactive authentication methods like Kerberos, OAuth, or certificate login, the browser cannot forget credentials, and thus automatic logouts are not useful for protecting credentials of forgotten sessions. Set to 0 to disable session timeout.
[Session]
IdleTimeout=15-
When not specified, there is no idle timeout by default.
- WarnBeforeConnecting
-
Whether to warn before connecting to remote hosts from the Shell. Defaults to true.
[Session]
WarnBeforeConnecting=false
Bugs
Please send bug reports to either the distribution bug tracker or the upstream bug tracker.
Author
Cockpit has been written by many contributors.
See also
cockpit-ws(8), cockpit-tls(8)
cockpit-ws(8)
Name
cockpit-ws - Cockpit web service
Synopsis
cockpit-ws [--help] [--port PORT] [--address ADDRESS] [--no-tls] [--for-tls-proxy] [--local-ssh] [--local-session BRIDGE]
Description
The cockpit-ws program is the web service component used for communication between the browser application and various configuration tools and services like cockpit-bridge(1).
Users or administrators should never need to start this program as it automatically started by systemd(1) on bootup, through cockpit-tls(8).
Transport security
cockpit-ws is normally run behind the cockpit-tls TLS terminating proxy, and only deals with unencrypted HTTP by itself. But for backwards compatibility it can also handle TLS connections by itself when being run directly. For details how to configure certificates, please refer to the cockpit-tls(8) documentation.
Timeout
When started via systemd(1) then cockpit-ws will exit after 90 seconds if nobody logs in, or after the last user is disconnected.
Options
- --help
-
Show help options.
- --port PORT
-
Serve HTTP requests PORT instead of port 9090. Usually Cockpit is started on demand by systemd socket activation, and this option has no effect. Update the ListenStream directive cockpit.socket file in the usual systemd manner.
- --address ADDRESS
-
Bind to address ADDRESS instead of binding to all available addresses. Usually Cockpit is started on demand by systemd socket activation, and this option has no effect. In that case, update the ListenStream directive in the cockpit.socket file in the usual systemd manner.
- --no-tls
-
Disable http to https redirection.
- --for-tls-proxy
-
Tell cockpit-ws that it is running behind a local reverse proxy that does the TLS termination. Then Cockpit puts https:// URLs into the default Content-Security-Policy, and accepts only https:// origins, instead of http: ones by default. However, if Origins is set in the cockpit.conf(5) configuration file, it will override this default.
- --local-ssh
-
Normally cockpit-ws uses cockpit-session and PAM to authenticate the user and start a user session. With this option enabled, it will instead authenticate via SSH at 127.0.0.1 port 22.
- --local-session BRIDGE
-
Skip all authentication and cockpit-session, and launch the cockpit-bridge specified in BRIDGE in the local session. If the BRIDGE is specified as
-then expect an already running bridge that is connected to stdin and stdout of this cockpit-ws process. This allows the web server to run as any unprivileged user in an already running session.
This mode implies --no-tls, thus you need to use http:// URLs with this.
|
Warning
|
With --local-session BRIDGE, you have to isolate the opened TCP port somehow (for example in a network namespace), otherwise all other users (or even remote machines if the port is not just listening on localhost) can access the session! |
Environment
The cockpit-ws process will use the XDG_CONFIG_DIRS environment variable from the XDG basedir spec to find its cockpit.conf(5) configuration file.
In addition the XDG_DATA_DIRS environment variable from the XDG basedir spec can be used to override the location to serve static files from. These are the files that are served to a non-logged in user.
Bugs
Please send bug reports to either the distribution bug tracker or the upstream bug tracker.
Author
Cockpit has been written by many contributors.
See also
cockpit-tls(8) , cockpit.conf(5) , systemd(1)
cockpit-tls(8)
Name
cockpit-tls - TLS proxy for Cockpit web service
Synopsis
cockpit-tls [--help] [--port PORT] [--no-tls] [--idle-timeout SECONDS]
Description
The cockpit-tls program is a TLS terminating HTTP proxy for cockpit-ws(8). It manages a set of isolated cockpit-ws instances, one per TLS client certificate, plus one for TLS without a client certificate, and one for unencrypted HTTP. With that, one session cannot tamper with another one through possible security vulnerability exploits.
Users or administrators should never need to start this program as it automatically started by systemd(1) via socket activation.
Transport security
To specify the TLS certificate the web service should use, simply drop a file with the extension .cert in the /etc/cockpit/ws-certs.d directory, or below $XDG_CONFIG_DIRS if set (see cockpit.conf). If there are multiple files in this directory, then the highest priority one is chosen after sorting.
The .cert file should contain at least two OpenSSL style PEM blocks.
First one or more BEGIN CERTIFICATE blocks for the server
certificate and intermediate certificate authorities and a second one
containing a BEGIN PRIVATE KEY or similar. The key must not be
encrypted.
If there is no TLS certificate, a self-signed certificate is automatically generated using sscg (if available) or openssl and stored in the 0-self-signed.cert file.
When enrolling into a FreeIPA domain, an SSL certificate is requested from the IPA server and stored in 10-ipa.cert.
To check which certificate cockpit-ws will use, run the following command.
$ sudo /usr/libexec/cockpit-certificate-ensure --check
Or, on Debian-based systems:
$ sudo /usr/lib/cockpit/cockpit-certificate-ensure --check
If using certmonger to manage certificates, following command can be used to generate a certificate/key pair:
CERT_FILE=/etc/cockpit/ws-certs.d/50-certmonger.crt
KEY_FILE=/etc/cockpit/ws-certs.d/50-certmonger.key

getcert request -f ${CERT_FILE} -k ${KEY_FILE} -D $(hostname --fqdn)
Options
- --help
-
Show help options.
- --port PORT
-
Serve HTTP requests on PORT instead of port 9090. Usually Cockpit is started on demand by systemd socket activation, and this option has no effect. Update the ListenStream directive cockpit.socket file in the usual systemd manner.
- --no-tls
-
Don’t use TLS. Certificates will not be read, and https connections denied. Then cockpit-tls will only manage a single cockpit-ws instance, and thus not do anything different than running cockpit-ws --no-tls directly. Only use this for debugging or testing.
- --idle-timeout SECONDS
-
If greater than 0, exit if no connections have happened for the given number of seconds, i. e. the server is idle. If not given, the default is 90.
Environment
The cockpit-tls program expects the RUNTIME_DIRECTORY environment variable to be set to an empty directory (preferably in /run/) that is only accessible by the system user under which it is running. This contains the Unix sockets for communicating with the cockpit-ws instances, and in the future, state information about client certificates. This variable is normally set by the cockpit.service systemd unit.
In addition, cockpit-tls will use the XDG_CONFIG_DIRS environment variable from the XDG basedir spec to find its certificates and the cockpit.conf(5) configuration file.
Bugs
Please send bug reports to either the distribution bug tracker or the upstream bug tracker.
Author
Cockpit has been written by many contributors.
See also
cockpit-ws(8) , cockpit.conf(5) , systemd(1)
cockpit-desktop(1)
Name
cockpit-desktop - Cockpit Desktop integration
Synopsis
cockpit-desktop URLPATH [SSH_HOST]
Description
The cockpit-desktop program provides secure access to Cockpit pages in an already running desktop session. It starts a web server (cockpit-ws) and a web browser in an isolated network namespace, and a cockpit-bridge(8) in the running user session.
This avoids having to log into Cockpit, and having to enable cockpit.socket system-wide. The network isolation ensures that no other user, and not even other processes in the user’s session, can access this local web server.
URLPATH is the Cockpit page to open, i. e. the path component of
Cockpit URLs. It is highly recommended to only open a
particular page frame, not the entire Cockpit navigation and menu. For example, the
path /cockpit/@localhost/storage/index.html will open the Storage
page. It is also possible to give abbreviated forms of urls, such as
“/storage” or “/network/firewall”.
SSH_HOST is an optional SSH remote host specification (hostname or username@hostname). If given, cockpit-bridge will be started on the remote host through ssh(1) instead, i. e. the Cockpit web browser will show that remote host. Note that this is more of an experimental/demo feature.
Environment
The BROWSER environment variable specifies the browser command (and possibly options) that will be used to open the requested Cockpit page. If not set, cockpit-desktop attempts to use an internal minimalistic WebKit browser, and failing that, will attempt to detect some reasonable alternatives.
Bugs
Please send bug reports to either the distribution bug tracker or the upstream bug tracker.
Author
Cockpit has been written by many contributors.
See also
cockpit-ws(8), cockpit-bridge(1)
cockpit-bridge(1)
Name
cockpit-bridge - Cockpit Host Bridge
Synopsis
cockpit-bridge [--help] [--packages]
Description
The cockpit-bridge program is used by Cockpit to relay messages and commands from the Web front end to the server. Among other things it relays DBus, and spawns processes on behalf of the Web user interface.
This program is not routinely run by users or administrators. It is in the $PATH so that Cockpit can find it when connecting between hosts. However there are some diagnostics available when running from the command line.
Options
- --help
-
Show help options.
- --interact=boundary
-
Interact with the raw cockpit1 protocol. Useful for debugging and testing. Specify a boundary which should be on an empty line between messages.
- --packages
-
List all available Cockpit packages and exit. Note this includes packages available to the user running this command.
- --version
-
Show Cockpit version information.
Bugs
Please send bug reports to either the distribution bug tracker or the upstream bug tracker.
Author
Cockpit has been written by many contributors.
See also
cockpit-ws(8)
pam_ssh_add(8)
Name
pam_ssh_add - PAM module to auto load ssh keys into an agent
Description
pam_ssh_add provides authentication and session modules that allow users to start their session with a running ssh-agent with as many ssh keys loaded as possible.
If used, the authentication module simply stores the authentication token for later use by the session module. Because this module performs no actual authentication it returns PAM_CRED_INSUFFICIENT on success and should always be accompanied by an actual authentication module in your pam configuration.
By default the session module will start a new ssh-agent and run ssh-add, loading any keys that exist in the default path for the newly logged in user. If any keys prompt for a password, and a authentication token was successfully stored, that token will be provided as the password.
Options
- debug
-
This option will turn on debug logging to syslog.
Examples
        auth     required  pam_unix.so
        auth     optional  pam_ssh_add.so
        session  optional  pam_ssh_add.so
Bugs
Please send bug reports to either the distribution bug tracker or the upstream bug tracker.
Author
Cockpit has been written by many contributors.
SSL/TLS Usage
Cockpit usually requires that web browsers communicate with it using HTTPS, for security reasons.
HTTPS Requirement
Cockpit listens for both HTTP and HTTPS connections on the same port, by default 9090. If an HTTP connection is made, Cockpit will redirect that connection to HTTPS. There are some exceptions:
-
If an HTTP connection comes from
localhost(127.0.0.1or::1, then Cockpit will allow communication without redirecting to HTTPS. -
Certain URLs, like
/pingare not required to use HTTPS.
This behavior can be overridden by setting the AllowUnencrypted
option in cockpit.conf.
Certificates
Cockpit will load a certificate from the /etc/cockpit/ws-certs.d,
directory, or below $XDG_CONFIG_DIRS if set (see
cockpit.conf). It will use the last file
with a .cert or .crt extension in alphabetical order. The file
should contain one or more OpenSSL style BEGIN CERTIFICATE blocks
for the server certificate and the intermediate certificate authorities.
The private key must be contained in a separate file with the same name
as the certificate, but with a .key suffix instead. The key must not
be encrypted.
If no certificate is found, a self-signed certificate is created and
stored in the 0-self-signed.cert file. On some platforms, Cockpit
will also generate a ca.crt in that directory, which may be safely
imported into client browsers.
Cockpit will read the files as root, so they can have tight permissions.
To check which certificate cockpit-ws will use run the following
command.
$ sudo /usr/libexec/cockpit-certificate-ensure --check
Or, on Debian-based systems:
$ sudo /usr/lib/cockpit/cockpit-certificate-ensure --check
If using certmonger to manage certificates, following command can be
used to automatically prepare a certificate/key file pair:
getcert request -f /etc/cockpit/ws-certs.d/50-certmonger.cert \
                -k /etc/cockpit/ws-certs.d/50-certmonger.key \
                -D myhostname.example.com \
                [--ca=...]
This will not work on Red Hat Enterprise Linux 8 by default. Adjust the
SELinux type of the certificate directory to cert_t to allow
certmonger to write its certificates there:
semanage fcontext -a -t cert_t '/etc/cockpit/ws-certs\.d(/.*)?'
restorecon -v /etc/cockpit/ws-certs.d
TCP Port and Address
Cockpit’s cockpit-ws component is configured by default to accept
connections on port 9090. This is the port that is documented for a
"Web-based System Manager" to listen on. It is also relatively
memorable.
However there are many reasons you may wish to change the default port.
For example other software may use port 9090 or you may wish to
setup Cockpit to listen on 443 instead. It is also possible to have
Cockpit only listen on one specific IP address.
Note that it is only required to have Cockpit listening on a TCP port on
the server that you access with your web browser. If you add multiple
servers with host switcher, Cockpit will connect to those servers via
ssh.
The systems that Cockpit runs on are typically locked down with firewalls, SELinux, so changing the default port is not as easy as editing a configuration file.
Cockpit systemd Socket
On servers with
systemd Cockpit
starts on demand via socket activation. To change its port and/or
address you should place the following content in the
/etc/systemd/system/cockpit.socket.d/listen.conf file. Create the
file and directories in that path which not already exist. The
ListenStream option specifies the desired address and TCP port.
[Socket]
ListenStream=
ListenStream=443
[Socket]
ListenStream=
ListenStream=7777
ListenStream=192.168.1.1:443
FreeBind=yes
|
Note
|
The first line with an empty value is intentional. systemd
allows multiple Listen directives to be declared in a single socket
unit; an empty value in a drop-in file resets the list and thus disables
the default port 9090 from the original unit.
|
The FreeBind option is highly recommended when defining specific IP
addresses. See the
systemd.socket
manpage for details.
In order for the changes to take effect, run the following commands:
$ sudo systemctl daemon-reload
$ sudo systemctl restart cockpit.socket
SELinux Port
If SELinux is protecting your server, then you will need to tell it to allow Cockpit to listen on the new port. Run the following command to do so. The last argument specifies the desired TCP port.
$ sudo semanage port -a -t websm_port_t -p tcp 9999
If the port is already defined by some other part of the SELinux policy,
then you will need to use the -m argument to modify the definition.
That’s the case with the 443 SSL port, which is typically defined as
an http_port_t port.
$ sudo semanage port -m -t websm_port_t -p tcp 443
The changes should take effect immediately.
Firewalld Port
If Firewalld is configured as your firewall, then you will need to tell it to allow Cockpit to receive connections on the new port. Run the following commands to do so. The last options specify the desired TCP port.
$ sudo firewall-cmd [--zone=ZONE] --add-port=443/tcp
$ sudo firewall-cmd --permanent [--zone=ZONE] --add-port=443/tcp
Start up
Cockpit’s cockpit-ws component is what the browser connects to and
it typically starts on demand via
systemd socket
activation.
The actual cockpit.service and cockpit-ws process will start on
demand when a browser accesses the cockpit.socket,
usually on port 9090. Once a user logs in then a
cockpit-bridge process will be started in a Linux user login
session.
Only systems that you connect to with your browser need to have the
cockpit.socket enabled. For systems that you add through host
switcher the bridge is started via SSH on demand.
Process exit
The cockpit-bridge process will exit when the user logs out. In
addition, after 10 minutes of inactivity, the cockpit-ws process
will exit on its own. The browser will automatically disconnect if it
fails to hear from the cockpit-ws process for 30 seconds.
Boot start up
To make Cockpit available by default after system boot the
cockpit.socket needs to be enabled:
$ sudo systemctl enable cockpit.socket
If you wish to not have Cockpit available by default via a browser, then
the cockpit.socket should be disabled:
$ sudo systemctl disable cockpit.socket
Managing multiple hosts at the same time
|
Warning
|
This feature is deprecated as of Cockpit 322. |
Cockpit allows you to access multiple hosts in a single session, by
establishing SSH connections to other hosts. This is quite similar to
logging into these other hosts using the ssh command on the command
line, with one very important difference:
Code from the local host and all the remote hosts run at the same time, in the same browser context. They are not isolated from each other in the browser. All code effectively has the same privileges as the primary session on the local host.
Thus, you should only only connect to remote hosts that you trust. You must be sure that none of the hosts that you connect to will cause Cockpit to load malicious JavaScript code into your browser.
Therefore, Cockpit will warn you before connecting to more than one host. It is also possible to disable multiple hosts entirely, and some operating systems do this already by default.
You can prevent loading of JavaScript, HTML, etc from more than one host
by adding this to cockpit.conf:
    [WebService]
    AllowMultiHost=false
When you allow multiple hosts in a single Cockpit session by setting
AllowMultiHost to true, then the user will be warned once per
session, before connecting to the second host. If that is still too
much, you can switch the warning off completely by adding the following
to cockpit.conf:
    [Session]
    WarnBeforeConnecting=false
Cockpit Authentication
While cockpit allows you to monitor and administer several servers at the same time, there is always a primary server your browser connects to that runs the Cockpit web service (cockpit-ws) through which connections to additional servers are established. See this diagram for how it works.
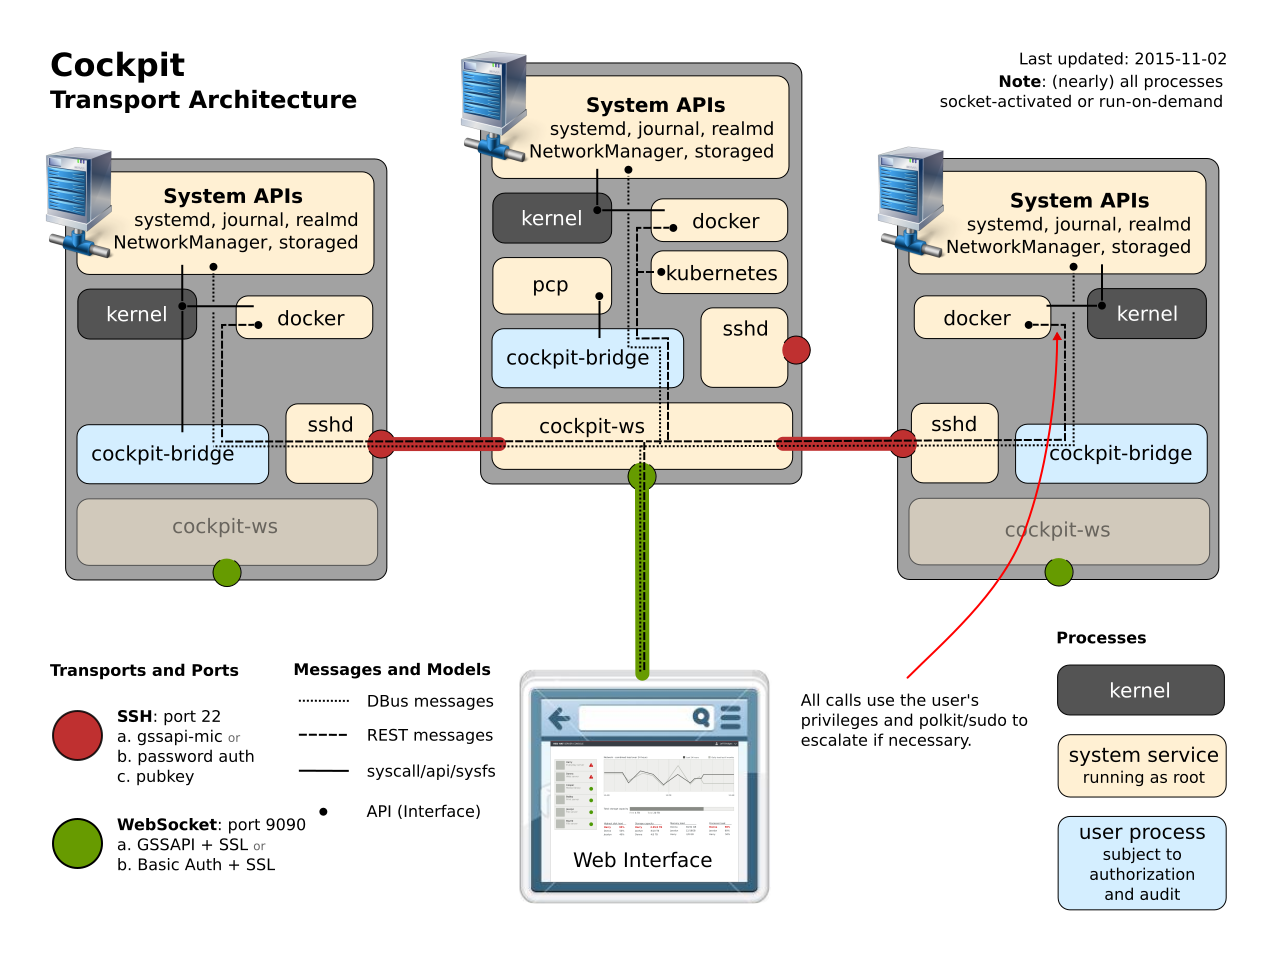
Normally, a session is established on the primary server, and you use the Shell UI of that session to connect to secondary servers.
However, it is also possible to instruct the cockpit-ws process on
the primary server to directly connect to a secondary server, without
opening a session on the primary server at all. This is done on the main
login page of Cockpit, by filling out the "Connect to" field.
Directly logging into the primary server
The most common way to use Cockpit is to just log directly into the server that you want to access. This can be done if you have direct network access to port 9090 on that server.
By default the cockpit web service is installed on the base system and
socket activated by systemd. In this setup access is
controlled by a cockpit specific pam stack, generally located at
/etc/pam.d/cockpit. By default this is configured to allow you to
login with the username and password of any local account on the system.
You can also setup a Kerberos based SSO solution or
certificate/smart card authentication.
You can also disable authentication schemes to enforce authentication policies, or to suppress undesired browser GSSAPI authentication dialogs.
The web server can also be run from the
cockpit/ws container. If you are
running cockpit on a container host operating system like
Fedora CoreOS this will be the only
supported mode. In this setup, cockpit establishes an SSH connection
from the container to the underlying host, meaning that it is up to your
SSH server to grant access. To login with a local account, sshd will
need to be configured to allow password based authentication.
Alternatively you can setup a Kerberos based SSO solution.
Like sshd, cockpit can be configured to limit the number of
concurrent login attempts allowed. This is done by adding a
MaxStartups option to the WebService section of your
cockpit.conf. Additional connections will be dropped until
authentication succeeds or the connections are closed.
Directly logging into a secondary server without a primary session
It is also possible to log into a secondary server without opening a session on the primary server. This is useful if you are not actually interested in the primary server and would only use it because you do not have direct network access to the secondary server.
In this case, cockpit-ws still runs on the primary server, but the
credentials from the login screen are directly used with SSH to log into
the secondary server given in the "Connect To" field of the login
screen.
Thus, the PAM configuration and accounts on the primary server don’t matter at all. Often, the only purpose of the primary server is to sit on the boundary of your network and forward connections to internal machines.
In this case, the login page will prompt you to verify unknown SSH keys. Accepted keys will be remembered in the local storage of your browser.
Logging into a secondary server from the primary session
Once you have a session on the primary server, it is possible connect to additional servers by using the host switching UI of the Cockpit Shell. This is useful if you have direct network access to the primary server, but not to the secondary server.
On the command line, you would log into the primary server and then use
SSH to log into the secondary one. Cockpit does just the same, and uses
SSH to log into the secondary server. Instead of running a interactive
shell there, however, it starts a cockpit-bridge process.
Warning: Unlike with SSH on the command line though, this will also load and use the Cockpit pages (i.e. JavaScript) from the remote machine, which means that the remote machine can execute arbitrary code on your primary and all other connected secondary machines. Hence, only connect to machines which you trust.
Due to this security risk, this host switcher functionality is disabled
by default, except on long-term stable Linux distributions (Red Hat
Enterprise Linux 9, Debian 12, and Ubuntu 22.04/24.04 LTS). If you are
comfortable with the security implications, you can enable it manually
with the AllowMultiHost option in cockpit.conf.
These servers will need to be running an SSH server and be configured to support one of the following authentication methods.
Password
The target server will need to have password based authentication
enabled in sshd.
Kerberos
The target server will need to be a member of the same domain as the primary server and your domain must be whitelisted in your browser. See the SSO documentation for how to set this up.
Public key
When you successfully log into the primary server, a ssh-agent is
started and keys are loaded into it by running ssh-add without any
arguments. Any passphrase prompt is answered with the password used to
log into the primary server.
Cockpit provides a user interface for loading other keys into the agent that could not be automatically loaded.
The target server will need to have public key authentication enabled in
sshd, and the public key you wish to use must be present in
~/.ssh/authorized_keys. Cockpit has a user interface for creating
SSH keys and for authorizing them.
SSH host keys
Cockpit will prompt the user to verify unknown SSH host keys, and will
write accepted host keys into ~/.ssh/known_hosts.
Single Sign On
Cockpit can use Kerberos for Single Sign On authentication, where users are automatically authenticated if they have a valid Kerberos ticket.
Server Requirements
To authenticate users, the server that Cockpit is running on must be
joined to a domain. This can usually be accomplished using the
realm join example.com
command.
The domain must be resolvable by DNS. For instance, the SRV records of the kerberos server should be resolvable:
$ host -t SRV  _kerberos._udp.example.com
_kerberos._udp.example.com has SRV record 0 100 88 dc.example.com
The server running Cockpit should have a fully qualified name that ends with the domain name.
There must be a valid Kerberos host key for the server in the
/etc/krb5.keytab file. Alternatively, if you would like to use a
different keytab, you can do so by placing it in
/etc/cockpit/krb5.keytab, or below $XDG_CONFIG_DIRS if set (see
cockpit.conf). It may be necessary to create
a kerberos service principal and update the keytab if it is not present.
Depending on your domain type different service names are required:
- Active Directory
-
HOST/server.example.com@EXAMPLE.COM - IPA and MIT
-
HTTP/server.example.com@EXAMPLE.COM
When joining an IPA domain with Cockpit and the ipa command line
tool is available, both the service principal name and a
/etc/cockpit/krb5.keytab get created automatically, so that Kerberos
based single sign on into Cockpit works out of the box. If you want/need
to do this by hand or in a script, first create or modify the HTTP/
service principal:
$ sudo ipa service-add --ok-as-delegate=true --ok-to-auth-as-delegate=true \
    HTTP/server.example.com@EXAMPLE.COM
# or, if it already exists, just enable delegation:
$ sudo ipa service-mod --ok-as-delegate=true --ok-to-auth-as-delegate=true \
    HTTP/server.example.com@EXAMPLE.COM
Then generate a key for that principal:
$ sudo ipa-getkeytab -p HTTP/server.example.com@EXAMPLE.COM -k /etc/cockpit/krb5.keytab
The following command can be used to list the
/etc/cockpit/krb5.keytab:
$ sudo klist -k /etc/cockpit/krb5.keytab
Lastly accounts from the domain must be resolvable to unix accounts on the server running Cockpit. For example:
$ getent passwd user@example.com
user@example.com:*:381001109:381000513:User Name:/home/user:/bin/sh
If you wish to delegate your kerberos credentials to Cockpit, and allow
Cockpit to then connect to other machines using those credentials, you
should enable delegation for the hosts running Cockpit, and in some
cases the HTTP service as well. When joining an IPA domain, this is
enabled by default.
Domain admins (usually the admins@example.com group) should normally
also be able to administer any joined machine. Enable sudo access for
that group with the following command on the IPA server, for version
4.7.1 and later:
ipa-advise enable-admins-sudo | sh -ex
On earlier FreeIPA versions, run these commands instead, as a domain admin on any joined machine:
ipa sudorule-add --hostcat=all --cmdcat=all All
ipa sudorule-add-user --groups=admins All
Note that this does not change security properties; domain admins can give this privilege to themselves, so it is safe to enable by default.
Client Requirements
The client side, where your web browser is running, should have a valid kerberos ticket in the current user session. A command like this will get one:
$ kinit user@EXAMPLE.COM
Password for user@EXAMPLE.COM:
In addition your browser must be usually be configured to allow kerberos authentication for the domain.
- Mozilla Firefox
-
Go to
about:configand set thenetwork.negotiate-auth.trusted-urissetting to your domain name preceded by a dot, ie:.example.com - Google Chrome
-
On Linux: create the file
/etc/opt/chrome/policies/managed/example-com.jsonwith the contents:
{
  "AuthServerWhitelist": "*example.com"
}
-
and restart the browser. On other platforms, exit your browser completely, and start it with a command line like this:
google-chrome --auth-server-whitelist=*example.com
Use a fully qualified server name (with the domain name at the end) to access Cockpit in your web browser.
If you wish to connect from one server to another in Cockpit using kerberos SSO, then you have to explicitly enable all sorts of things. For starters, make sure that delegated credentials are allowed by your domain (see above). Next when requesting your kerberos ticket make sure that forwardable tickets are requested:
$ kinit -f user@EXAMPLE.COM
Password for user@EXAMPLE.COM:
Make sure that the forwardable flag F is present in your ticket:
$ klist -f
Ticket cache: KEYRING:persistent:1000:1000
Default principal: user@EXAMPLE.COM

Valid starting       Expires              Service principal
18.03.2017 05:39:23  19.03.2017 05:39:20  krbtgt/EXAMPLE.COM@EXAMPLE.COM
    Flags: FIA
Lastly configure your browser to allow delegated, forwardable kerberos credentials to be sent to Cockpit:
- Mozilla Firefox
-
Go to
about:configand set thenetwork.negotiate-auth.delegation-urissetting to your domain name preceded by a dot, ie:.example.com - Google Chrome
-
On Linux: create the file
/etc/opt/chrome/policies/managed/example-com.jsonwith the contents:
{
  "AuthServerWhitelist": "*example.com",
  "AuthNegotiateDelegateWhitelist": "*example.com"
}
-
and restart the browser. On other platforms, exit your browser completely, and start it with a command line like this:
google-chrome --auth-server-whitelist=*example.com --auth-negotiate-delegate-whitelist=*example.com
Certificate/smart card authentication
Cockpit can use TLS client certificates for authenticating users. Commonly these are provided by a smart card, but it’s equally possible to import certificates directly into the web browser.
This requires the host to be in an Identity Management domain like FreeIPA or Active Directory, which can associate certificates to users.
To authenticate users from a Identity Management domain, the server that Cockpit is running on must be joined to that domain. See the SSO server requirements for details.
User certificate generation
Generating the certificates for users is usually done with a certificate management system like certmonger or FreeIPA, which are not documented here. This command generates a simple key and certificate request for the "alice" user:
openssl req -new -newkey rsa:2048 -days 365 \
    -keyout alice.key -out alice.csr -subj "/CN=alice"
Now get this certificate request signed by the Certificate Authority of your Identity Management domain, to get a PEM certificate. Browsers and smart cart utilities accept PKCS#12 format for importing/transfer, so convert the certificate/key pair; it will ask for and protect it with a transfer password:
openssl pkcs12 -export -in alice.pem -inkey alice.key -out alice.p12
Don’t forget to clean up the key file when you do not need it any more:
shred -u alice.key
You can now import alice.p12 directly into your browser, with giving
the transfer password set above. Or
put the certificate onto a smart
card:
pkcs15-init --store-private-key alice.p12 --format pkcs12 --auth-id 01
Certificate mapping with FreeIPA
The recommended method to sign a user certificate request and associate
it to a user is ipa cert-request:
ipa cert-request alice.csr --principal=alice --certificate-out=alice.pem
Alternatively, if you are using a different CA, you can use
ipa user-add-cert to associate the signed certificate to the user.
This expects PEM format, but without the -----BEGIN/-----END
markers:
ipa user-add-cert alice --certificate="$(grep -v ^---- alice.pem)"
See the FreeIPA User Certificates documentation for details.
Certificate mapping with Microsoft Active Directory
The domain user certificates get imported into the
userCertificate;binary LDAP attribute. The following commands
convert the PEM certificate into binary DER form, create an
LDIF file and
apply it to the LDAP server running on the domain controller
"dc.example.com":
openssl x509 -outform der -in alice.pem -out alice.der

cat <<EOF > alice.ldif
version: 1
dn: cn=alice,ou=users,ou=YOUR_NETBIOS_NAME,dc=example,dc=com
changetype: modify
add: userCertificate;binary
userCertificate;binary:< file://$(pwd)/alice.der
EOF

ldapmodify -H ldap://dc.example.com -f alice.ldif
Certificate mapping with Samba Active Directory
At least some versions of Samba do not support
the userCertificate;binary LDAP attribute, so the import has to
happen in base64 PEM form into the textual userCertificate attribute
instead. Also, Samba uses a slightly different user hierarchy:
cat <<EOF > alice.ldif
version: 1
dn: cn=alice,cn=users,dc=example,dc=com
changetype: modify
add: userCertificate
userCertificate: $(grep -v ^---- alice.pem | tr -d '\n')
EOF

ldapmodify -H ldap://dc.example.com  -f alice.ldif
As userCertificate is a text instead of binary field, you need to
set up a
certificate
mapping rule in sssd.conf(5) in a [certmap/domain/rulename]
section, for example:
[certmap/example.com/adcerts]
# we match full certificates, so it is not important to check anything here
matchrule = <KU>digitalSignature
maprule = LDAP:(userCertificate={cert!base64})
Cockpit web server configuration
Set the trusted Certificate Authority of your user certificates in
sssd, either by copying the CA PEM file to
/etc/sssd/pki/sssd_auth_ca_db.pem or setting the
pam_cert_db_path
configuration option to the path of the CA. If you use FreeIPA and its
CA:
cp /etc/ipa/ca.crt /etc/sssd/pki/sssd_auth_ca_db.pem
Certificate authentication needs to be enabled in cockpit.conf explicitly:
[WebService]
ClientCertAuthentication = yes
When enabling this mode,
other
authentication types commonly get disabled, so that only client
certificate authentication will be accepted. By default, after a failed
certificate authentication attempt, Cockpit’s normal login page will
appear and permit other login types such as basic (passwords) or
negotiate (Kerberos). For example, password authentication gets
disabled with:
[basic]
action = none
Cockpit web server resource limits
When using certificate authentication, all requests with a particular certificate will be handled by a separate and isolated instance of the cockpit-ws web server. This protects against possible vulnerabilities in the web server and prevents an attacker from impersonating another user. However, this introduces a potential Denial of Service: Some remote attacker could create a large number of certificates and send a large number of http requests to Cockpit with these.
To mitigate that, all cockpit-ws instances run in a
system-cockpithttps.slice
systemd
slice unit which
limits
the collective resources of these web server instances: by default,
this slice sets a limit of 200 threads (roughly 100 instances of
cockpit-ws — in other words, a maximum of 100 parallel user
sessions with different certificates) and a 75% (soft)/90% (hard) memory
limit.
You are welcome to adjust these limits to your need through a drop-in. For example:
# systemctl edit system-cockpithttps.slice

[Slice]
# change existing value
TasksMax=100
# add new restriction
CPUQuota=30%
Authentication to other services like sudo and ssh
Once you logged into Cockpit with a certificate, you likely need to switch to administrative mode (root privileges through sudo), or connect to remote machines through SSH. If your user account has a password, that can be used for authenticating to sudo or ssh as usual.
Supported with FreeIPA only: As an alternative to password authentication, you can also declare the initial Cockpit certificate authentication as trusted for authenticating to SSH, sudo, or other services. For that purpose, Cockpit automatically creates an S4U2Proxy Kerberos ticket in the user session:
$ klist
Ticket cache: FILE:/run/user/1894000001/cockpit-session-3692.ccache
Default principal: user@EXAMPLE.COM

Valid starting     Expires            Service principal
07/30/21 09:19:06  07/31/21 09:19:06  HTTP/myhost.example.com@EXAMPLE.COM
07/30/21 09:19:06  07/31/21 09:19:06  krbtgt/EXAMPLE.COM@EXAMPLE.COM
    for client HTTP/myhost.example.com@EXAMPLE.COM
You can set up
constrained
delegation rules to enumerate which hosts (including its own) that
ticket is trusted to access. For example, if the cockpit session runs on
host myhost.example.com and should be trusted to access its own host
(through sudo) and another host remote.example.com (through ssh),
create a delegation like this:
# a list of target machines which can be accessed by a particular rule
ipa servicedelegationtarget-add cockpit-target
ipa servicedelegationtarget-add-member cockpit-target \
  --principals=host/myhost.example.com@EXAMPLE.COM \
  --principals=host/remote.example.com@EXAMPLE.COM

# allow cockpit sessions (HTTP/ principal) to access that host list
ipa servicedelegationrule-add cockpit-delegation
ipa servicedelegationrule-add-member cockpit-delegation \
  --principals=HTTP/myhost.example.com@EXAMPLE.COM
ipa servicedelegationrule-add-target cockpit-delegation \
  --servicedelegationtargets=cockpit-target
In addition, you need to enable GSS (Kerberos) authentication in the corresponding services.
-
For SSH, enable
GSSAPIAuthentication yesin /etc/ssh/sshd_config. -
For sudo, enable
pam_sss_gssas described in the manpage: In/etc/sssd/sssd.conf: Add an entry for your domain:[domain/example.com] pam_gssapi_services = sudo, sudo-i
In
/etc/pam.d/sudo, enable the module in the first line:auth sufficient pam_sss_gss.so
Caveat: The delegated S4U ticket is not yet forwarded to remote SSH hosts when connecting to them from Cockpit, so authenticating to sudo on the remote host with that ticket does not work. This will be provided in a future version.
Privileges and Permissions
When a user is logged into Cockpit, they are logged into a normal session that has exactly the same privileges as if they logged in via SSH or on the console.
However, Cockpit will usually try to escalate the privileges of the user using Policy Kit or sudo. If the user is able to escalate privileges from the command line by typing in their password again (or without typing in any password), then Cockpit will be able to escalate the privileges of the session to "root" immediately upon login.
The user can change the privileges of a session from within that session, via the "Administrative access" indicator in the top bar. From that indicator, the user can drop "root" privileges and regain them. On the next login, Cockpit will give the session the same privileges.
Usually a user needs to be in the wheel Unix user group for the user
to be able to escalate privileges in this way. However both Policy Kit
and sudo may be configured to use other criteria.
Customizing Polkit Privileges
Services like
systemd and
NetworkManager use
Polkit to validate
and escalate privileges. It is possible to customize these rules with
files in /etc/polkit-1/rules.d.
Polkit rules files are
javascript
with specific methods and objects. For example, placing the following
polkit rule to /etc/polkit-1/rules.d/10-operators.rule allows all
users in the operators group to start, stop, restart and otherwise
manage systemd services:
polkit.addRule(function(action, subject) {
    if (action.id == "org.freedesktop.systemd1.manage-units") {
        if (subject.isInGroup("operators")) {
            return polkit.Result.YES;
        }
    }
});
In order to allow a certain group to perform any administrative action you could add a rule like this:
polkit.addAdminRule(function(action, subject) {
    return ["unix-group:operators"];
});
Feature Internals
systemd
Cockpit uses systemd and the DBus APIs it provides to configure and monitor core aspects of the system. Use of alternate system APIs are not currently implemented.
For non root users, systemd controls access to its APIs via Policy Kit and a user logged into Cockpit will have the same permissions as they do from the command line.
Cockpit retrieves information about the host and changes the hostname
via the hostnamed daemon. To perform similar tasks from the command
line use the
hostnamectl
command:
$ hostnamectl
   Static hostname: pink.example.com
   Pretty hostname: Pink
         Icon name: computer-desktop
           Chassis: desktop
        Machine ID: ef00b79be229463cbb844c3e715de96c
           Boot ID: 934983d64d34465cb5a8383b5a89ad8c
  Operating System: Fedora 22 (Twenty Two)
       CPE OS Name: cpe:/o:fedoraproject:fedora:22
            Kernel: Linux 4.0.4-301.fc22.x86_64
      Architecture: x86-64
Cockpit configures the system time and time zone via the timedated
daemon. To perform similar tasks from the command line use the
timedatectl
command:
$ timedatectl list-timezones
Africa/Abidjan
Africa/Accra
Africa/Addis_Ababa
Africa/Algiers
...
Cockpit can manage the list of NTP servers used by systemd-timesyncd
by putting its own file into /etc/systemd/timesyncd.conf.d/. Note
that systemd-timesyncd is not always enabled, depending on the
configuration of the machine. In that case, Cockpit disabled the UI for
managing the list of NTP servers. In some cases use of ntpd can
cause the timedated daemon to behave inconsistently with regards to
time synchronization.
Cockpit reboots or powers down the machine by using the
shutdown
command. To perform similar tasks from the command line, run it
directly:
$ sudo shutdown +15
Shutdown scheduled for Sa 2015-09-26 15:49:40 CEST, use 'shutdown -c' to cancel.
Cockpit manages system services and sockets via systemd. To perform
similar tasks from the command line use the
systemctl
command:
$ systemctl status cockpit
● cockpit.service - Cockpit Web Service
   Loaded: loaded (/usr/lib/systemd/system/cockpit.service; static; vendor preset: disabled)
  Drop-In: /etc/systemd/system/cockpit.service.d
           └─debug.conf
   Active: active (running) since Sa 2015-09-26 13:28:02 CEST; 2h 7min ago
     Docs: man:cockpit-ws(8)
 Main PID: 6957 (cockpit-ws)
   Memory: 1.8M
   CGroup: /system.slice/cockpit.service
           ├─ 6957 /usr/libexec/cockpit-ws
           └─29598 /usr/bin/ssh-agent
In order to customize who can perform various actions in system, create polkit rules with the following actions and details:
org.freedesktop.systemd1.manage-units-
Permission to manage system services or other units. Details available:
unit,verb org.freedesktop.systemd1.manage-unit-files-
Permission to manage system services or other unit files.
org.freedesktop.systemd1.reload-daemon-
Permission to reload the systemd state.
For example, placing the following polkit rule to
/etc/polkit-1/rules.d/10-http.rule allows all users in the
operators group start, stop, and restart the Apache HTTP service:
polkit.addRule(function(action, subject) {
    if (action.id == "org.freedesktop.systemd1.manage-units") {
        if (subject.isInGroup("operators") && action.lookup("unit") == "httpd.service") {
            var verb = action.lookup("verb");
            if (verb == "start" || verb == "stop" || verb == "restart") {
                return polkit.Result.YES;
            }
        }
    }
});
Journal
The systemd journal provides Cockpit with indexed log data. This log data is found on the Journal page, as well as in various other places when configuring services, storage, networking etc.
Cockpit accesses Journal data via the
journalctl
command. Similar tasks can be performed at the command line:
$ sudo journalctl -f -u docker
...
NetworkManager
If available on the system, Cockpit uses NetworkManager and the DBus APIs it provides to interact with the system’s network configuration.
For non root users, NetworkManager controls access to its APIs via Policy Kit and a user logged into Cockpit will have the same permissions as they do from the command line.
To perform similar tasks from the command line, use the nmcli command:
$ nmcli general status
STATE      CONNECTIVITY  WIFI-HW  WIFI     WWAN-HW  WWAN
connected  full          enabled  enabled  enabled  enabled
Devices marked as "not managed" with the NM_CONTROLLED=no setting
will not be displayed in the interface.
Firewall
Cockpit uses firewalld to interact with the system’s firewall. No firewall configuration UI will be shown if firewalld is not installed.
Firewalld controls access to its APIs via PolicyKit. The user logged into Cockpit needs to have the appropriate permissions to view or modify the settings.
Cockpit can currently only show, add, and remove predefined firewalld services in the default zone.
To perform similar tasks from the command line, use firewall-cmd. For example, to get the same list of allowed services that Cockpit displays:
$ sudo firewall-cmd --list-services
dhcpv6-client samba-client mdns ssh cockpit
To enable an additional service, use:
$ firewall-cmd --add-service pop3
success
storaged
If available on the system, Cockpit uses
storaged to configure
and monitor storage, disks, mounts etc. on the system. This
functionality is present in the Cockpit storaged package.
The storaged project is originally based on a project called
udisks and added
support for many more features such as
LVM,
iSCSI,
Multipath, and
BTRFS. The same tools
and backwards compatible API are available between storaged and
udisks the projects. Cockpit can use udisks but disables many of
it’s storage related features, including updating /etc/fstab and
/etc/crypttab for stability reasons.
For non root users, storaged controls access to its APIs via Policy Kit and a user logged into Cockpit will have the same permissions as they do from the command line.
To perform similar tasks from the command line, use the storagedctl
command:
$ udisksctl dump
...
To perform LVM tasks, you may use the various LVM commands, such as
vgcreate, lvresize and so on. Cockpit will detect such changes
made at the command line.
Cockpit recognizes devices with multiple paths and can start the
multipathd service in case it is not running. On the command line,
you can control multipath features with the mpathconf,
multipathd, and multipath commands.
To manage iSCSI initiators from the command line, you can use
iscsiadm and related tools.
User Tools
Cockpit uses the usual tools to create and modify local user accounts.
Examples are useradd, usermod and passwd. These same tools
are available for use on the command line.
realmd
If available on the system, Cockpit uses realmd and the DBus APIs it provides to configure the system’s Active Directory or IPA domain membership.
Not all systems can join all kinds of domains. This depends on the availability of the necessary client software.
For non root users, realmd controls access to its APIs via Policy Kit and a user logged into Cockpit will have the same permissions as they do from the command line.
To perform similar tasks from the command line, use the realm command:
$ realm join example.com
Password for Administrator:
realmd sets up
domain-qualified user names by default, i. e. login user names look like
“user@example.com”. For using unqualified names (just “user”),
set the fully-qualified-names option in
/etc/realmd.conf
before joining a domain.
Cockpit requests an SSL certificate from the IPA server for
cockpit-ws with the
ipa-getcert command.
Terminal
Cockpit provides a standard shell in a terminal. This shell and the processes running in it have the same privileges as if the user had logged in via SSH.
PCP Metrics
If available, Cockpit uses the Performance Co-Pilot framework to gather metrics data about the system. This data is used to display the history graphs on the "Metrics and history" page. Cockpit can use the PCP logging feature to display archived data about the system from a different point in time. If PCP is not available, then Cockpit gathers the metrics data itself, but archival features are not available.
Whether or not metrics are archived depends on whether the
pmlogger.service systemd unit
is running or not. The "Enable PCP metrics collector" button on the
Metrics page will enable and start this service.
$ pmstat
@ Sat Sep 26 15:30:10 2015
 loadavg                      memory      swap        io    system         cpu
   1 min   swpd   free   buff  cache   pi   po   bi   bo   in   cs  us  sy  id
    4.19      0 20710m 605148  6450m    0    0    0 2548 5688  14K  19   3  76
...
systemctl enable --now redis pmproxy
# if you use firewalld, open port 44322:
firewall-cmd --permanent --add-service pmproxy
firewall-cmd --reload
This allows you to gather and visualize PCP metrics from multiple machines with Grafana and the PCP Grafana plugin.
Multiple Machines
|
Warning
|
This feature is deprecated as of Cockpit 322. |
Cockpit can connect to multiple machines from a single Cockpit session. These are listed in the host switcher.
These additional machines are accessed via SSH from the machine that the first machine connected to, and are authenticated with the logged in user’s password and/or SSH keys.
SSH host keys are stored in /etc/ssh/ssh_known_hosts.
The machine data is stored in /etc/cockpit/machines.d/*.json, or
below $XDG_CONFIG_DIRS if set (see
cockpit.conf). Settings in lexicographically
later files amend or override settings in earlier ones. Cockpit itself
writes into 99-webui.json; packages or admins who want to
pre-configure machines should ship files like 05-mymachine.json so
that changes from the web interface override the pre-configured files.
Each JSON file contains an object that maps machine IDs to objects that define the properties of that machine. The ID can be a human readable name or an IP address or any other unique value, and is shown in the web interface until conneting to it the first time, at which point the web interface will show the machine’s host name.
The following properties are recognized:
"address"-
(string, mandatory) IP address or DNS name of the machine
"visible"-
(boolean, optional) If
true, the machine will be displayed and available for managing with Cockpit. Iffalse(the default), it will not be displayed, but still taken into account for type-ahead search when adding new machines in the web interface. "user"-
(string, optional) User name on the remote machine. When not given, Cockpit will default to the user name that was being used to log into Cockpit itself.
"port"-
(integer, optional) ssh port of the remote machine. When not given, the default port 22 is used.
"color"-
(string, optional) Color to assign to the machine label in the web interface. This can be either given as
rgb(r_value, g_value, b_value)with each value being an integer between 0 and 255, or as a color name likeyellow. When not given, Cockpit will assign an unused color automatically.
Example:
{
    "web server": {
        "address": "192.168.2.4",
        "visible": true,
        "color": "rgb(100, 200, 0)",
        "user": "admin"
    },
    "192.168.2.1": {
        "address": "192.168.2.1",
        "port": 2222,
        "visible": true,
        "color": "green"
    }
}
SELinux Policy
If present on the system Cockpit can set the SELinux mode to enforcing
or permissive. It can also use setroubleshootd to show audit issues
and apply suggested fixes.
To perform similar tasks from the command line use the setenforce
and sealert tools.
To clear out all the information that setroubleshootd tracks, you
can use a commands like:
$ sudo killall setroubleshootd
$ sudo rm -rf /var/lib/setroubleshoot/*
Tuned Profiles
If present on the system Cockpit can use Tuned and the DBUS API it
provides to set system performance profiles. To perform similar tasks
from the command line, use the tuned-adm command.
SOS Report
If present on the system Cockpit can use sosreport to collect system
configuration and diagnostic information.
To perform similar tasks from the command line, use the sosreport
command.
Package Updates
Cockpit uses the PackageKit D-Bus API to get information about available package updates and to apply them, in an Operating System independent manner.
To perform similar tasks from the command line, use the pkcon command:
$ pkcon refresh

$ pkcon get-updates
Available  sudo-1.8.20p2-1.fc26.x86_64 (updates-testing)
    Allows restricted root access for specified users
Available  vim-filesystem-2:8.0.617-1.fc26.x86_64 (updates-testing)
    VIM filesystem layout
Available  vim-minimal-2:8.0.617-1.fc26.x86_64 (updates-testing)
    A minimal version of the VIM editor

$ pkcon get-update-detail sudo
Details about the update:6.x86_64 [fedora]
 Package: sudo-1.8.20p2-1.fc26.x86_64
 Bugzilla: https://bugzilla.redhat.com/show_bug.cgi?id=1452941
 Update text: - update to 1.8.20p2
    - added sudo package to dnf/yum protected packages

$ pkcon update
The following packages have to be updated:
 sudo-1.8.20p2-1.fc26.x86_64    Allows restricted root access for specified users
 vim-filesystem-2:8.0.617-1.fc26.x86_64 VIM filesystem layout
 vim-minimal-2:8.0.617-1.fc26.x86_64    A minimal version of the VIM editor
Proceed with changes? [N/y] y
[...]
Of course you can also use your Operating System specific commands for
that, such as dnf updateinfo info on Fedora or sudo apt upgrade
on Debian.
Developer Guide
Embedding and Integrating Cockpit
Cockpit can be embedded in other web applications either as a whole or specific Cockpit components can be integrated. Due to frame security policy restrictions, this only works if Cockpit and the web application have the same origin; this is commonly achieved by running both from a common reverse proxy.
Embedding the Cockpit Interface
Cockpit can be embedded into a larger web page as a frame. To embed the
entire Cockpit Window use the URI: https://server.example.com:9090/
<html>
  <head>
    <title>Embedded Cockpit</title>
  </head>
  <body>
    This is Cockpit.
    <br/>
    <iframe width="800px" height="600px"
            src="https://server.example.com:9090/"/>
  </body>
</html>
Integrating Cockpit Components into Web Applications
Instead of embedding the entirety of Cockpit, you can integrate specific components. Only those components explicitly documented as API should be integrated. Other components can and will change regularly.
The component will load from the server in question and a WebSocket connection will be established with the server to relay the component’s message stream.
Cockpit components are HTML files contained in packages.
These can be placed in an iframe or web browser window. Each documented
and stable component has a well-known URL and these are documented in
the API reference. Each component URL begins with the
string /cockpit/@localhost/ followed a package name, and then the
component itself.
For example the terminal.html in the
system package, has this URL:
/cockpit/@localhost/system/terminal.html
<html>
  <head>
    <title>Embedded Terminal</title>
  </head>
  <body>
    This is a terminal.
    <br/>
    <iframe width="800px" height="600px"
      src="https://server.example.com:9090/cockpit/@localhost/system/terminal.html"/>
  </body>
</html>
Deep Integration
Most often simple integration will be used to bring Cockpit components into web applications. However it is also possible to do deep integration for embedders who wish to perform non-standard authentication with the server, and relay the component’s message stream to the server themselves.
|
Warning
|
Deep integration capability is in heavy flux and is not yet documented. |
Pinging Cockpit
When embedding Cockpit or integrating Cockpit components, it may be necessary to check whether Cockpit is available on a server before proceeding.
To do this perform a /ping request to Cockpit. This is a simple HTTP
GET request. It returns the following:
GET: https://server.example.com:9090/ping
200 OK: { "service": "cockpit" }
The /ping request allows
Cross Origin
Resource Sharing headers and as such can be performed from Javascript
code with any origin. The request can also be made via plain HTTP
without SSL. It is by design that no further information is present in
the response.
A complete example of using /ping is available in the Cockpit
sources in the /examples/ping-server/ directory.
Cockpit Packages
Cockpit is separated into various packages, each of which brings specific features and/or code.
|
Warning
|
In addition, any APIs or behavior not explicitly documented here is an internal API and can be changed at any time. |
Layout of Package Files
A package consists of one or more files placed in a directory or its
subdirectories. It must have a manifest.json file and follow certain
naming conventions.
The name of a package is the name of the directory.
The name of the package must be ASCII alphanumeric, and may contain an underscore. Names of directories and files in the package must consist of ASCII alphanumeric along with dash, underscore, dot, and comma. No spaces are allowed.
Cockpit uses the data directories from the
XDG
Base Directory Specification to locate packages. The $XDG_DATA_DIRS
represents a colon separate list of system data directories, and
$XDG_DATA_HOME is a user specific data directory. If the environment
variables are not set, defaults are used, according to the spec. If
cockpit has been built with an alternate --prefix=/path then the
$prefix/share/cockpit is used by default.
A cockpit/ subdirectories in any of these data directories is the
location where packages are loaded by Cockpit. If Cockpit finds a
package with the same name, in multiple data directories, then the first
one wins. According to the spec the first data directory is
$XDG_DATA_HOME and then $XDG_DATA_DIRS in order.
This means that, by default the following directories are searched for cockpit packages, and in this order:
-
~/.local/share/cockpit/ -
/usr/local/share/cockpit/ -
/usr/share/cockpit/
Packages placed in $XDG_DATA_HOME are not cached by Cockpit or the
web browser. Other packages are cached aggressively, and are accessed
using a checksum of the files in the packages and their names.
You can use the following command to list the packages installed on a server. You’ll note that it’s output may change when you run the command as different users, if there are packages installed in the user’s home directory.
$ cockpit-bridge --packages
...
To further clarify things, here is an example package called "my-package" and its file layout:
/usr/share/cockpit/
    my-package/
        manifest.json
        file.html
        some.js
Place or symlink packages in your ~/.local/share/cockpit directory
(or appropriate $XDG_DATA_HOME location) that you would like to
modify and develop. System installed packages should not change while
Cockpit is running.
Package Manifest
Each package has a manifest.json file. It is a JSON object. The
following fields may be present in the manifest:
- content-security-policy
-
By default Cockpit serves packages using a strict Content Security Policy, which among other things does not allow inline styles or scripts. This can be overridden on a per-package basis, with this setting. + If the overridden content security policy does not contain a
default-src,connect-src,base-uri,form-action,object-src, orblock-all-mixed-contentthen these will be added to the policy from the manifest. - name
-
An optional string that changes the name of the package. Normally packages derive their name from the directory that they are located in. This field overrides that name.
- priority
-
An optional number that specifies which package is preferred in cases where there are conflicts. For example given two packages with the same
namea package is chosen based on its priority. - conditions
-
An optional list of
{"predicate": "value"}objects. Cockpit will only consider the package if all conditions are met. This is preferable to usingpriority.
Currently supported predicates arepath-existsandpath-not-exists(since Cockpit 286) andany(since Cockpit 348).anyaccepts a list of conditions and evaluates to true if at least one of the nested conditions is met. Unknown predicates are ignored. - requires
-
An optional JSON object that contains a
"cockpit"string version number. The package will only be usable if the Cockpit bridge and javascript base are equal or newer than the given version number. - version
-
An informational version number for the package.
- preload
-
A list of identifiers of the components that should be preloaded. Normally, the files of a component are loaded when the user navigates to it for the first time. The files of a preloaded component are loaded immediately after the user logs in, and the initialization code of the component is invoked. + The value of this field is an array of strings, where each string is one of the keys used in the
dashboard,menu, ortoolfields that are explained below. - parent
-
This option is used when module does not have its own menu item but is a part of a different module. This is described by JSON object with properties
componentwhich takes name of the superordinate component anddocswith list of documentation URLs for the given page. See below for structure ofdocsproperty.
In addition, the following keys contain information about where components of the package should appear in Cockpit’s user interface. Each of these keys is optional and contains an object mapping unique identifiers to menu items, which are described below. (The naming of these fields doesn’t perfectly match the current user interface for historical reasons.)
- dashboard
-
Dashboard items appear in the menu under the section Apps.
- menu
-
These items appear in the menu under the section System. This section is roughly ordered into these categories (with their order in parentheses): +
-
System Information (10)
-
Logs (20)
-
Configuring major subsystems (30-40)
-
Things running on the machine (VMs, Containers - 50-60)
-
Implementation Details (Accounts, Services - 70-100)
-
- tools
-
These items appear in the menu under the section Tools.
Menu items and tools are registered using JSON objects that have the following properties:
- label
-
The label for the menu item or tool.
- order
-
An optional order number to place this menu item or tool. Lower numbers are listed first.
- path
-
The relative path to the HTML file within the package that implements the menu item or tool.
- docs
-
List of documentation URLs for the given page. Each item is an object containing
labelandurl. - keywords
-
Keywords that describe the page and which are used for searching. These keywords should be lowercase. Keywords is a list containing keyword items as described below. Page label is prepended as first keyword in the first keyword item.
Keyword items are registered using JSON objects that have the following properties:
- matches
-
List of keywords to be matched.
- goto
-
Optional path that is used for all keywords in this item. When this argument starts with slash, then it is used as pathname, otherwise it is used as hash. Defining
goto:"page_hash"in page withpath:"/page_path"would redirect to/page_path#page_hash, whilegoto:"/page_path"would redirect to/page_pathignoring default page path. - weight
-
How much keywords are prioritized over others. Default is 3.
- translate
-
falsewhen keywords should not be localized. Default istrue.
An example manifest.json with some optional properties set:
{
  "version": 0,
  "require": {
      "cockpit": "120"
  },
  "tools": {
     "mytool": {
        "label": "My Tool",
        "path": "tool.html"
     }
  }
}
{
  "version": 0,
  "require": {
    "cockpit": "120"
  },
  "conditions": [
    {"path-exists": "/usr/bin/mytool"},
    {"path-exists": "/etc/mytool.conf"},
    {"path-not-exist": "/etc/incompatible-tool"}
  ],
  "tools": {
     "mytool": {
        "label": "My Tool",
        "path": "tool.html"
     }
  }
}
The following example shows how to use disjunctive conditions with any
to specify alternative requirements (available since Cockpit 348). This
package will be available if either /usr/bin/alt1 or /usr/bin/alt2
exists. In any case, /etc/incompatible-tool must not exist.
"conditions": [
  {"any": [{"path-exists": "/usr/bin/alt1"}, {"path-exists": "/usr/bin/alt2"}]},
  {"path-not-exists": "/etc/incompatible-tool"}
]
Manifest overrides
To change a manifest system-wide, a file
<package-directory-name>.override.json may be placed into
/etc/cockpit/, or below $XDG_CONFIG_DIRS if set (see
cockpit.conf). To change it for a particular
user only, put the override into ~/.config/cockpit.
These override the information in the manifest in the simple JSON Merge Patch format.
This can be used to hide or modify menu items of an existing package.
For example /etc/cockpit/systemd.override.json or
~/.config/cockpit/systemd.override.json could hide the Logs menu
item and move the Services menu item to the top of the menu.
{
  "menu": {
    "logs": null,
    "services": {
      "order": -1
    }
  }
}
Package Links and Paths
When referring to files in your package, such as in a hyperlink or a
<style> tag or <script> tag, simply use a relative path, and
refer to the files in the same directory. When you need to refer to
files in another package use a relative link.
For example here’s how to include the base cockpit.js script in your
HTML from the latest package:
<script src="../base1/cockpit.js"></script>
Do not assume you can link to any file in any other package. Refer to the list of API packages for those that are available for use.
Content Negotiation
In order to support gzipped and/or minified data, the files in a package
are loaded using content negotiation logic. A HTTP request for the file
test.js in the package named mypackage will return
mypackage/test.js or mypackage/test.js.gz (in undefined
preference). If neither exists, then it returns
mypackage/test.js.min or mypackage/test.js.min.gz (again in
undefined preference).
When packages are loaded from a system directory, Cockpit optimizes the file system lookups above, by pre-listing the files. This is one of the reasons that you should never change packages installed to a system directory while Cockpit is running.
Using Cockpit API
Cockpit has API available for writing packages. There is no API available for external callers to invoke via HTTP, REST or otherwise.
API from various packages can be used to implement Cockpit packages. Each package listed here has some API available for use. Only the API explicitly documented should be used.
To include javascript from the API, simply load it into your HTML using a script tag. Alternatively you can use an javascript loader.
Bridges for specific tasks
On the server side the cockpit-bridge
connects to various system APIs that the front end UI requests it to.
There are additional bridges for specific tasks that the main
cockpit-bridge cannot handle, such as using the PCP C library API.
These additional bridges can be registered in a "bridges" section of
a package’s manifest.json file. Building such a bridge is a complex
tasks, and we will skip over that here. However it is useful to adjust
how these additional bridges are called, and so we’ll look at how they
are registered.
An example manifest.json with a bridges section:
{
    "bridges": [
        {
            "match": { "payload": "metrics1" },
            "spawn": [ "/usr/libexec/cockpit-pcp" ]
        }
    ]
}
The bridges are considered in the order they are listed in the array.
Use the manifest.json`"priority"` field to control order between
packages. The bridges are registered using JSON objects that have the
following properties:
- environ
-
Optional, additional environment variables to pass to the bridge command.
- match
-
The
"match"object describes which channel open command options need to match for a given channel to be handed over to this bridge. - privileged
-
If set to
true, this marks the bridge as a superuser bridge. Cockpit will start one of these explicitly when trying to escalate the privileges of a session. A privileged bridge can not have a"match"property. - label
-
Setting this enables selection of privileged bridges in the UI. When no privileged bridge has a
label, then Cockpit will start the bridge that runssudo. This is the case in a default Cockpit installation. When at least one privileged bridge has alabelthen the user can select one of them when escalating privileges. As a special case, if only one bridge has alabel, then the step of selecting a bridge is omitted in the UI and that one bridge is always started. + Thus, if you add a privileged bridge with alabelin a new manifest, Cockpit will use that bridge the next time a user opens the "Administrative access" dialog. If you want the user to choose between thesudomethod and your new one, you need to duplicate thesudobridge definition in your manifest and give it a label. - problem
-
If a problem is specified, and this bridge fails to start up then channels will be closed with this problem code. Otherwise later bridges or internal handlers for the channel will be invoked.
- spawn
-
The command and arguments to invoke.
The spawn and environ values can be dynamically taken from a
matching open command values. When a value in either the spawn or
environ array contains a named variable wrapped in ${}, the
variable will be replaced with the value contained in the matching open
command. Only named variables are supported and name can only contain
letters, numbers and the following symbols: ._-
For example a bridges section like:
{
  "bridges": [
    {
      "match": { "payload": "example" },
      "environ": [ "TAG=${tag}" ],
      "spawn: [ "/example-bridge", "--tag", "${tag}" ],
      "problem": "access-denied"
    }
  ]
}
when a open command is received with a payload of example with
tag value of tag1. The following command will be spawned
TAG=tag1 /example-bridge --tag tag1
Processes that are reused so if another open command with a "tag" of
tag1 is received. The open command will be passed to existing
process, rather than spawning a new one. However a open command with an
tag of tag2 will spawn a new command:
TAG=tag2 /example-bridge --tag tag2
If you need to include ${}, as an actual value in your arguments you
can escape it by prefixing it with a \
Replacing an existing package
If the functionality in a package replaces that of another package then
it can replace that package by claiming the same name and a higher
priority.
For example, a package in the /usr/share/cockpit/disks directory
could replace Cockpit’s storage package with a manifest.json like
this:
{
  "version": 0,
  "name": "storage",
  "priority": 10,
  "menu": {
     "index": {
        "label": "Disk Storage",
        "order": 15
     }
  }
}
Cockpit URLs
Cockpit URLs follow a specific structure, related to the components they
are loading. Various components are loaded in <iframe> tags. The
URLs for these components are described first. Further down below you
can find information about the top level bookmarkable Cockpit address
URLs.
Component URLs
Cockpit components are HTML documents. They are organized into packages. Each package contains information about which HTML components are available in that package. Components should always use relative URLs to access resources, such as images, scripts or CSS files, even if they refer to a resource in another package.
The following are valid component URLs, each bit will be discussed below:
/cockpit/@localhost/package/component.html#/hash
/cockpit/$checksum/package/component.html#/hash
/cockpit/@server.example.com/package/component.html#/hash
/cockpit+embedder/@localhost/package/component.html#/hash
All resource URLs are under the /cockpit namespace. In cases where a
Cockpit component is being embedded the /cockpit
may be followed by a plus sign and another embedder specific
identifier.
What follows is either a @host or $checksum which tells cockpit
where to find the package. Checksums are used when more
than one host has identical packages and the resources can be cached.
The package name is next, followed by the component HTML path
inside that package. And lastly a hash allows for navigation within a
single component. The hash should follow a URL path and/or query string
form.
|
Warning
|
Never assume that the |
Visible URLs
The above Component URLs are usually not visible to the user. Instead the Cockpit Web Service wraps the components in a shell which allows navigation, and provides bookmarkable clean URLs to the component. These URLs do not affect embedders or components directly.
If no path is present then the Cockpit will redirect to the default page for the server.
If the first segment of the path begins with an @ sign, then the
component is being shown from a non-local host.
The next segment of the path, (or first if the component is being shown
on the local host) is the package name. The remainder of
the path is a component file in the package. If no further path segments
are present, a default index.html component in the package is
loaded. An extension of .html is automatically appended.
The hash portion of the path is automatically transferred to the component as the hash of its resource URL.
API: base1
This package contains basic support API available to other packages.
cockpit.js
Basic cockpit API to interact with the system
Loading cockpit.js
cockpit.js should be loaded via a script tag.
<script src="../base1/cockpit.js">
cockpit.js: Object Caching
If the same information is displayed by multiple components in Cockpit,
cockpit.cache() provides a way to share data between them. The
shared data should be simple objects, arrays, and values, and not
contain functions or other objects.
cockpit.cache()
cache = cockpit.cache(key, provider, consumer)
Create a new cache object. The key should be a globally unique
string that describes the data being cached. This string must describe
the data, across all machines and all versions of cockpit. It is
customary to include a version number in the key string.
function provider(result, key) {
    result("myvalue");

    return {
        close: function() {
            /* closed */
        }
    };
}
The provider is a function that will be invoked to start retrieving
data for the cache. It will be passed a result function as its first
argument. The result should be invoked whenever new data is
available. The key argument matches the key string the cache was
created with.
The provider can return an object with a close method. This
method will be invoked when the cache no longer needs data from the
provider.
function consumer(value, key) {
    /* ... */
}
The consumer is a function that will be passed new values when they
are available, whether they come from the provider or a source in a
different component/frame.
cache.close()
cache.close()
Close a cache and stop calling its consumer. If the provider was
invoked, then the close() method it returned will be invoked.
cockpit.js: Raw Channels
At a low level Cockpit communicates with the system via messages passed
through various channels. These are usually exposed via higher level
APIs, such as the cockpit.spawn() function. It is rare to use raw
channels directly.
cockpit.channel()
channel = cockpit.channel(options)
This function creates a new channel for communication with the system.
It returns a new channel object. The options argument is a plain
object. At least the "payload" option is required, and based on the
payload type, other options may be required.
"binary"-
Set to
trueto transfer binary payloads. Both messages sent viachannel.send()and those received viachannel.onmessageshould be arrays of bytes, eitherUint8ArrayorArraydepending on browser support. "payload"-
The payload type for the channel. Only specific payload types are supported.
"superuser"-
Set to
"require"to open this channel as root. If the currently logged in user is not permitted to become root (eg: viapkexec) then thechannelwill immediately be closed with a"access-denied"problem code. + Set to"try"to try to open the channel as root, but if that fails, then fall back to an unprivileged channel.
The channel object returned has the following fields and methods and
events. You should call the channel.close() method when done with
the channel.
A valid channel will always be returned and the is ready to
channel.send(). The channel may
close shortly afterword due to a
failure.
channel.binary
Will be true for an binary channel. Will be set to false if the
channel is textual.
channel.options
The options used to open this channel. This should not be changed.
channel.valid
Will be true for an open channel. Will be set to false if the
channel closes.
channel.send()
channel.send(data)
Send a message over the channel. The contents of the message depends on
the payload type of the channel. If a binary channel, then data is
expected to be an Array of bytes or a Uint8Array. If not binary,
then the data will be converted to a string if not already a string.
channel.control()
channel.control(options)
Notify the channel to tune certain parameters on the fly. The
options is a plain javascript object, and the contents depend on the
"payload" of the channel.
One common operation is to set "command" to "done" in the
options field. To indicate that no further messages will be sent through
the channel.
channel.wait()
promise = channel.wait([callback])
Returns a promise that is ready when the channel is ready, or fails
if the client closes. If a callback is specified, it is attached to
the promise. The promise will be rejected or resolved with the contents
options passed to the
channel.onready and
channel.onclose events respectively.
In general it’s not necessary to wait for the channel before starting to use the channel.
channel.close()
channel.close([options])
Close the channel.
If options is present it can be a plain javascript object containing
additional channel close options to send to the peer. If closing for
because of a problem, set the "problem" field to a
problem code. If options is not an object it
will be treated as a "problem".
The close event will fire. A channel can also be closed by a peer or if the underlying transport closes.
channel.onmessage
channel.addEventListener("message", function(event, data) { ... })
An event triggered when the channel receives a message. The message is
passed as a string to the handler in the data. In the case of binary
channels data is an Uint8Array or an Array of bytes if the
former is not supported by the browser. The contents of the message
depends on the payload type of the channel.
channel.oncontrol
channel.addEventListener("control", function(event, options) { ... })
An event triggered when the channel receives an control message in the
middle of the flow. One particular use is when the command is set to
"done" then no further messages will be received in the channel. The
exact form of these messages depend on the "payload" of the channel.
channel.onready
channel.addEventListener("ready", function(event, options) { ... })
An event triggered when the other end of the channel is ready to start processing messages. This indicates the channel is completely open. It is possible to start sending messages on the channel before this point.
channel.onclose
channel.addEventListener("close", function(event, options) { ... })
An event triggered when the channel closes. This can happen either because channel.close() function was called, or if the peer closed the channel, or the underlying transport closes.
The options will contain various close information, including a
"problem" field which will be set if the channel was closed because
of a problem.
cockpit.transport.origin
cockpit.transport.origin
The HTTP origin that is being used by the underlying channel transport.
This is read-only, you should not assign a value. If the browser
supports window.location.origin then this will be identical to that
value.
cockpit.transport.host
cockpit.transport.host
The host that this transport is going to talk to by default. This is read-only, you should not assign a value. If the value is null that means that the transport has not been setup yet.
cockpit.transport.csrf_token
cockpit.transport.csrf_token
A cross site request forgery token for use with external channels. This becomes valid once the connection is properly established.
cockpit.transport.options
cockpit.transport.options
Initialization options received over the underlying channel transport. These will be empty until connection is properly established.
cockpit.transport.wait()
cockpit.transport.wait(callback)
Call the callback function once the underlying channel transport is
initialized. This will start the initialization if not already in
progress or completed. If the channel transport is already initialized,
then callback will be called immediately.
In general it’s not necessary to wait for the transport before starting to open channels.
cockpit.transport.close()
cockpit.transport.close([problem])
Close the underlying channel transport. All channels open channels will
close. The problem argument should be a problem code string. If not
specified it will default to "disconnected".
cockpit.transport.filter()
cockpit.transport.filter((message, channelid, control) => { ... })
Add a filter to the underlying channel transport. All incoming messages will be passed to each of the filter callbacks that are registered.
This function is rarely used.
Filter callbacks are called in the order they are registered. If a
filter callback returns false then the message will not be
dispatched further, whether to other filters, or to channels, etc.
The message is the string or array with the raw message including,
the framing. The channelid is the channel identifier or an empty
string for control messages. If control is set then this is a
control message,d and the control argument contains the parsed JSON
object of the control message.
cockpit.transport.inject()
cockpit.transport.inject(message, [out])
Inject a message into the underlying channel transport. The message
should be a string or an array of bytes, and should be valid
according to the Cockpit message protocol. If the out argument is
equal to false then the message will be injected as an incoming
message as if it was received on the underlying channel transport.
This function is rarely used. In general you should only inject()
messages you got from a filter().
cockpit.base64_encode()
string = cockpit.base64_encode(data)
Encode binary data into a string using the Base64 encoding. The data
argument can either be a string, an Array, an ArrayBuffer or
a Uint8Array. The return value is a string.
cockpit.base64_decode()
data = cockpit.base64_decode(string, [constructor])
Decode binary data from a Base64 encoded string. The string argument
should be a javascript string. The returned data> will be an array
of bytes.
You can pass Uint8Array, Array or String as an alternate
constructor if you want the decoded data in an alternate form. The
default is to return an Array. Note that if you use a String for
the decoded data, then you must guarantee that the data does not contain
bytes that would be invalid for a string.
cockpit.js: DBus Client
Cockpit allows access to DBus services via this API.
DBus Types
DBus values are represented as javascript values and objects as follows:
BYTE 'y'-
Javascript number.
BOOLEAN 'b'-
Javascript boolean.
INT16 'n'-
Javascript number.
UINT16 'q'-
Javascript number.
INT32 'i'-
Javascript number.
UINT32 'u'-
Javascript number.
INT64 'x'-
Javascript number.
UINT64 't'-
Javascript number.
DOUBLE 'd'-
Javascript number.
STRING 's'-
Javascript string.
OBJECT_PATH 'o'-
Javascript string.
SIGNATURE 'g'-
Javascript string.
ARRAY of BYTE 'ay'-
A string containing base64 encoded data.
ARRAY of DICT_ENTRY with STRING keys 'a{s?}'-
A javascript plain object with the keys as property names.
ARRAY of DICT_ENTRY with other keys 'a{??}'-
A javascript plain object each key JSON encoded into a string property name.
ARRAY of other-
A javascript array.
VARIANT-
A javascript plain object with the
"t"property set to a DBus type string, and the"v"property set to a value. HANDLE 'h'-
A javascript object that describes a cockpit channel which represents the passed file descriptor. The
payloadis always set tostream. Pass it to cockpit.channel() to create the channel and start reading or writing on it. Handles can only be received, not sent from within cockpit.
cockpit.dbus()
client = cockpit.dbus(name, [options])
Create a DBus client for the given bus name (eg: service name). Use
the following functions to make DBus method calls, watch for events,
etc. The optional options argument is a javascript plain object, and
may include:
"bus"-
The DBus bus to connect to. Specifying
"session"will connect to the DBus user session bus,"user"will connect to the user bus (on some systems this is identical to the session bus),"system"will connect to the DBus system bus, and"none"to the non-standard bus specified with theaddressoption. This defaults to "system" if not present. "address"-
The bus address to connect to in case
busis"none". "superuser"-
Set to
"require"to talk to this service as root. The DBus service will see the DBus method calls and accesses as coming from root, rather than the logged in user. This is useful for talking to services that do not correctly use polkit to authorize administrative users. If the currently logged in user is not permitted to become root (eg: viapkexec) then theclientwill immediately be closed with a"access-denied"problem code. + Set to"try"to try to talk as root, but if that fails, fall back to unprivileged. "track"-
It is valid for a DBus service to exit, and be restarted in such a way that clients continue to talk to it across the restart. Some services are not written with this in mind. If the
"track"option is set totruethen the channel will close when the service exits and/or disconnects from the DBus bus.
If the name argument is null, and no options other than "bus"
are specified, then a shared DBus client is created. When using such
a client with a DBus bus, a "name" option must be specified on
various other methods in order to specify which client to talk to.
client.wait()
promise = client.wait([callback])
Returns a promise that is ready when the client is ready, or fails
if the client closes. If a callback is specified, it is attached to
the promise.
client.close()
client.close([problem])
Close the DBus client. If problem is specified it should be a
problem code string.
client.onclose
client.addEventListener("close", options => { ... })
An event triggered when the DBus client closes. This can happen either because client.close() function was called, or the DBus service went away, or some other problem or disconnection.
The options will contain various close information, including a
"problem" field which will be set if the channel was closed because
of a problem.
client.onowner
client.addEventListener("owner", (event, owner) => { ... })
An event triggered when the owner of the DBus name changes. The owner value will be the id of the name owner on the bus or null if the name is unowned. The absence of an owner should not be treated as a disconnection. However this makes it possible to take some action based on the actual status of the service, for example disconnecting a pending signal handler.
client.options
Set to the options used when creating the client. Will not change for the life of the client.
client.unique_name
The unique DBus name of the client. Initially null, and becomes valid once the the client is ready.
client.proxy()
proxy = client.proxy([interface, path], [options])
Create proxy javascript object for a DBus interface. At the
specified DBus object path. The proxy will have properties, methods
and signals from to the DBus interface, and allows for natural
interaction. If no interface is specified then the DBus bus name of
the client is used. If no path is specified, then the DBus name of
the client is converted to a path.
If creating lots of proxies for a given interface it is more
efficient to use the client.proxies()
function.
The proxy is loaded when the
proxy.valid field is true, and
it is set to false if the underlying interface and/or path
don’t or no longer exist, or the client has closed. You can wait for
proxy to become valid by passing a callback to its
proxy.wait() function. The
proxy.onchanged event will also
fire when the proxy becomes valid or invalid. DBus properties and
methods on the proxy are not defined until the proxy becomes valid.
value = proxy.Prop1
proxy.WritableProp = value
All DBus properties on the interface that start with an upper case
letter (as is convention) will be automatically defined on this proxy,
and will update their values as the DBus property values change. In
addition the proxy.onchanged
event will fire every time the properties change.
If you assign a value to a writable property on the proxy, the proxy
will try to set that property on the DBus interface at path. The
actual proxy property value will not update until the DBus service has
notified the proxy of the change. If setting a property fails a warning
will be logged. In order to have more reliable setting of properties, or
track when they have been set, or if setting fails, use the
client.call() directly. It should be noted
that DBus service implementations may also be inconsistent in their
behavior when setting a property fails.
You can access the raw property data using the
proxy.data field, including data for
properties that do not start with an upper case letter.
proxy.Method(arg1, arg2)
    .then((retval1, retval2) => {
        ...
    })
    .catch(ex => {
        ...
    });
All DBus methods on the interface that start with an upper case
letter (as is convention) will be automatically defined on this proxy.
These methods are called with arguments as normal javascript arguments.
A
Promise
that will complete successfully when the method returns, or fail if an
error occurs. The return values from the DBus method will be passed to
the then handler function directly.
Methods that do not start with an upper case letter can be invoked by
using the usual proxy.call()
directly.
proxy.addEventListener("signal", (event, arg1, arg2) => {
    ...
});
All DBus signals on the interface that start with an upper case
letter (as is convention) will be automatically emit events on this
proxy. These events will contain the signal arguments after the standard
event argument.
Signals that do not start with an upper case letter can be subscribed to
by using proxy.onsignal directly.
Usually a proxy asks the client to watch and notify it of changes to
the relevant object or path. You can pass an options argument with
the watch field set to false to prevent this.
proxy.client
Set to the DBus client of the proxy. Will not change for the life of the proxy.
proxy.path
Set to the DBus object path of the proxy. Will not change for the life of the proxy.
proxy.iface
Set to the DBus interface name of the proxy. Will not change for the life of the proxy.
proxy.valid
Set to true when the proxy’s DBus interface is present at its DBus
path, and all information for the proxy has loaded. Is set to false
while loading, and after the proxy no longer refers a DBus interface and
path. Also set to false if the client closes.
Use the by proxy.wait() function to
wait for a proxy to load. The
proxy.onchanged event will also
be emitted when the proxy becomes valid or invalid. DBus properties and
methods on the proxy are not defined until the proxy becomes valid.
proxy.data
A plain javascript object containing all the raw property data that this
proxy has loaded. This will be updated automatically as the proxy is
notified of property changes from the DBus service. The
proxy.onchanged event will be
emitted when it changes.
proxy.call()
invocation = proxy.call(method, args, [options])
Make a DBus method call on this proxy.
For DBus methods that start with an upper case letter, is usually more convenient to call the method directly on the proxy. However if methods that do not follow the usual DBus convention, or specify additional options, or the caller cannot be sure that the method actually exists, you can use this method.
This function also works on proxies that have are still loading and have not become valid yet.
The method should be a DBus method name, and the args should be
an array of arguments to pass to the method. The options are
described elsewhere.
The returned value is identical to the one returned from client.call(). It is a Promise that will complete successfully when the method returns, or fail if an error occurs.
proxy.wait()
promise = proxy.wait()
proxy.wait(() => {
    ...
});
Wait for a proxy to finish loading. This function returns a promise. If
a callback function is passed as an argument then that function will be
invoked when the proxy is ready. If this method is called after a proxy
has already loaded, then the promise will be resolved immediately, and
any callback will be invoked immediately. Use the promise or
proxy.valid to determine whether the proxy is valid.
proxy.onchanged
proxy.addEventListener("changed", (event, data) => {
    ...
});
This event is emitted when the proxy’s properties change.
The data has the following form, and will only include properties
that have changed:
{
    "Prop1": "value",
    "Prop2": 5
}
proxy.onsignal
proxy.addEventListener("signal", (event, name, args) => {
    ...
});
This event is emitted when the proxy’s emits an event.
For most events, that have names which start with an upper case letter, you can just connect to that event as a signal directly. However if you wish to be notified when any signal is emitted, or for signals that do not follow the usual DBus convention, you can connect to this event.
The name is the DBus signal name, and the args is an array of
arguments that were emitted with the signal.
client.proxies()
proxies = client.proxies([interface], [path_namespace], [options])
Create proxy javascript objects for a DBus
interfaces. The proxies will have properties, methods and signals from
the DBus interface, and allow for natural interaction. If no
interface is specified then the DBus bus name of the client is used.
If no path_namespace is provided then "/" will be used.
Proxies will be automatically created for instances of the interface
available at the DBus service. The optional path_namespace argument
can be used to restrict the proxies for instances that have DBus paths
which have the namespace path prefix.
proxy1 = proxies["/dbus/path1"];
proxy2 = proxies["/dbus/path2"];
for (proxy in proxies) {
    ...
}
The returned proxies object will is used as a dictionary, and will
have values containing proxies for DBus interface instances, with the
keys being the DBus paths of those instances. It is possible to
enumerate over the returned proxies.
Proxies will be automatically added and removed from the proxies
object as they appear and disappear in the service. The
proxies.onadded and
proxies.onremoved events will
be emitted. DBus services may not support notifications of paths
disappearing.
Use the proxies.wait() function to be notified when the initial set
of proxies has been populated.
Usually a proxies ask the client to watch and be notified of changes
to the relevant object or path. You can pass an options argument
with the watch field set to false to prevent this.
proxies.wait()
promise = proxies.wait()
proxies.wait(() => {
    ...
});
Wait for a proxies object to populate its initial set of proxies.
This function returns a promise. If a callback function is passed as an
argument then that function will be invoked when the proxies are ready.
If this method is called after the proxies have populated, then the
promise will be resolved immediately, and any callback will be invoked
immediately.
proxies.client
Set to the DBus client of the proxies. Will not change.
proxies.iface
Set to the DBus interface name of the proxies. Will not change.
proxies.path_namespace
Set to the DBus path namespace used which the proxies must have as a DBus path prefix. Will not change.
proxies.onadded
proxies.addEventListener("added", (event, proxy) => {
    ...
})
This event is emitted when a proxy is added to the proxies object.
The proxy will already have loaded.
proxies.onchanged
proxies.addEventListener("changed", (event, proxy) => {
    ...
})
This event is emitted when one of the proxy in the proxies object
changes its properties.
proxies.onremoved
proxies.addEventListener("removed", (event, proxy) => {
    ...
})
This event is emitted when a proxy is removed to the proxies object.
client.call()
invocation = client.call(path, interface, method, args, [options])
Make a DBus method call.
The path is the DBus object path to make the call on, interface
is the DBus interface for the method and method is the name of the
method to call. The args is an array of arguments to pass to the
method, each of which must be appropriate for the expected
DBus type of that argument. The args may be
null if no arguments are to be sent.
The returned value is a Promise that will complete successfully when the method returns, or fail if an error occurs.
If options is specified it should be a plain javascript object,
which may contain the following properties:
flags-
A string containing DBus message flags. The character
"i"indicates to the dbus service that interactive authentication is allowed. If the entireflagsfield is missing, then"i"is set by default. type-
A valid DBus type signature to use when calling the method. In the absence of this, the DBus service will be introspected (and the result cached) to ask what the method type signature is.
timeout-
The timeout of the call in milliseconds. The call will fail with the
"timeout"problem code. If "timeout" is not given, the call will never time out.
invocation.then()
invocation.then((args, options) => { ... })
This is a standard Promise method. It sets up a handler to be called when the DBus method call finishes successfully.
The args argument is an array of return values from the DBus method.
Each of them will be converted to an appropriate
javascript type.
The options argument may contain additional information about the
reply. If the type option was specified when performing the method
call, then the options in the reply here will also contain a
type field containing the DBus type signature of the output. If the
flags option was specified when performing the call then the
options in the reply here will contain message flags. Possible out
message flags are:
>-
A big endian message.
<-
A little endian message.
invocation.catch()
invocation.catch(exception => { ... })
This is a standard Promise method. It sets up a handler to be called when the DBus method call fails.
The exception object passed to the handler can have the following
properties:
problem-
A problem code string when a problem occurred starting or communicating with the DBus service. This is
nullin the cases where an actual DBus error was occurred. name-
The DBus error name. This will be
nullin cases where the failure was not due to a DBus error. message-
A DBus error message. This will be
nullin cases where the failure was not due to a DBus error.
client.subscribe()
subscription = client.subscribe(match, (path, interface, signal, args) => { ... })
Subscribe to signals. The match argument is a javascript plain
object which defines what signals to subscribe to. Each property in the
match argument restricts signals subscribed to. If a property is not
present then it is treated as a wildcard, matching anything. If an empty
object is specified as match then all signals will be subscribed to.
The match argument may contain the following properties:
interface-
A DBus interface to match.
path-
A DBus object path to match. May not be used together with the
path_namespaceproperty. It should be a valid DBus object path, that is, it should have no trailing slash. path_namespace-
A DBus object path prefix to match. Any paths in the hierarchy below this top path will match. May not be used together with the
pathproperty. member-
The DBus signal name to match.
arg0-
Matches the first argument of a DBus message, which must be a string.
The handler passed as the second argument will be invoked when the
signal is received. A subscription is returned which can be used to
remove the subscription by calling its subscription.remove() method.
It is not a problem to subscribe to the same signals more than once,
with identical or slightly different match arguments.
subscription.remove()
subscription.remove()
Unsubscribe from the DBus signal subscription.
client.watch()
watch = client.watch(path)
watch = client.watch({ "path_namespace": path_namespace, "interface": interface })
Watch for property and interface changes on the given DBus object
path DBus path_namespace. If interface is specified only
properties on that DBus interface will be watched.
The client.proxy() and
client.proxies() functions and the
objects they return are high level wrappers around client.watch().
The property and interface changes will be available in raw form on the
client.onnotify event.
Property and interface changes that are caused by a method call or signal will show up before that method call reply is received, or signal event is triggered. It should be possible to rely on this guarantee, unless the DBus service in question behaves incorrectly. Internally these watches work well with code that implements the ObjectManager portion of the DBus specification. If no ObjectManager implementation is available, the watch falls back to using DBus Introspection along with the usual PropertiesChanged signal. If the DBus service implements none of these, or implements them in an inconsistent manner, then this function will provide inconsistent or unexpected results.
The parameter is either a DBus path or a plain javascript object
with zero or more of the following fields. If an empty javascript object
is used as an argument, then all paths, interfaces and properties will
be watched.
interface-
Watch properties on this DBus interface.
path-
Watch interfaces and properties at this DBus path. May not be used together with the
path_namespaceproperty. path_namespace-
Watch interfaces and properties under this DBus path. It should be a valid DBus object path, that is, it should have no trailing slash. If an ObjectManager implementation is available at this interface, then it is used. May not be used together with the
pathproperty.
The returned value is a
Promise
that will complete successfully when the watch has populated its initial
set of properties and interfaces, and these have been notified via
client.onnotify.
A watch can be removed by calling the
watch.remove() method on the
returned value. If identical watches are added more than once, then they
must also be removed the same number of times before the removal takes
effect.
watch.then()
watch.then(() => { ... })
This is a standard Promise method. It sets up a handler to be called when the watch has populated its initial properties and interfaces.
watch.catch()
watch.catch(ex => { ... })
This is a standard Promise method. It sets up a handler to be called if the watch fails to populate its initial properties and interfaces. Note that a watch will only fail if the DBus client closes or is somehow disconnected. It does not fail in the case of missing interfaces or properties.
watch.remove()
watch.remove()
Remove the watch. This may not have any immediate effect if other watches are in place. In particular, if identical watches are added more than once, then they must also be removed the same number of times before the removal takes effect.
client.onnotify
client.addEventListener("notify", data => { ... })
An event triggered when watched properties or interfaces change.
The client.proxy() and
client.proxies() functions and the
objects they return are high level wrappers around the data provided
by this event.
The data has the following form:
{
    "/path1": {
        "org.Interface1": {
            "Prop1": "value",
            "Prop2": 5
        },
        "org.Interface2": null
    }
}
Multiple paths may be present, each of which may have multiple
interfaces, each of which may have multiple properties. The first time a
given path and interface is emitted from this signal, it will have all
its properties and interfaces. Thereafter only changes are noted. If an
interface is set to null, then that interface has disappeared.
client.notify()
client.notify(data)
Emits a synthetic notify event. The
data argument should follow the same layout as described for the
notify event.
client.onmeta
client.onmeta = (ev, data) => { ... }
An event triggered when the meta data about watched interfaces is loaded.
The client.proxy() and
client.proxies() functions and the
objects they return are high level wrappers around the data provided
by this event.
The data has the following form:
  {
      "org.Interface": {
          "methods": {
              "Method1": {
                  "in": [ "s", "v" ],
                  "out": [ "i" ]
              },
              "Method2": { }
          },
          "signals": {
              "Signal": {
                  "in": [ "b", "s" ]
              }
          },
          "properties": {
              "Prop1": {
                  "flags": "rw",
                  "type": "s"
              },
              "Prop2": {
                  "flags": "r",
                  "type": "b"
              }
          }
      }
  }
Multiple interfaces may be present, each of which may have methods and
properties. This is emitted before the first
client.onnotify event for the relevant
interface.
cockpit.variant()
variant = cockpit.variant(type, value)
A DBus variant is represented as a plain javascript object with a
"t" property represesting the full DBus type of the variant, and a
"v" property containing the variant value.
This is a helper function for creating such a variant object.
cockpit.js: Errors
cockpit.js: Errors
Problem codes and messages
Problem Codes
Cockpit represents problems with standardized problem string codes.
"access-denied"-
The user is not permitted to perform the action in question.
"authentication-failed"-
User authentication failed.
"internal-error"-
An unexpected internal error without further info. This should not happen during the normal course of operations.
"no-cockpit"-
The system does not have a compatible version of Cockpit installed or installed properly.
"no-session"-
Cockpit is not logged in.
"not-found"-
Something specifically requested was not found, such as a file, executable etc.
"terminated"-
Something was terminated forcibly, such as a connection, process session, etc.
"timeout"-
Something timed out.
"unknown-hostkey"-
The remote host had an unexpected or unknown key.
"no-forwarding"-
Could not forward authentication credentials to the remote host.
cockpit.message()
message = cockpit.message(problem)
message = cockpit.message(exception)
Return a message for the exception or problem code passed as an
argument. If the argument is an object with a "message" property, as
is the case with most exceptions, that will be returned directly. If the
argument is an object with a "problem" property, then it will be
used as the problem code. An appropriate message will be returned for
problem codes.
cockpit.js: File Access
The cockpit.file API lets you read, write, and watch regular files
in their entirety. It cannot efficiently do random access in a big file
or read non-regular files such as /dev/random.
file = cockpit.file(path,
                    { syntax: syntax_object,
                      binary: boolean,
                      max_read_size: int,
                      superuser: string,
                    })

promise = file.read()
promise
    .then((content, tag) => { ... })
    .catch(error => { ... })

promise = file.replace(content, [ expected_tag ])
promise
    .then(new_tag => { ... })
    .catch(error => { ... })

promise = file.modify(callback, [ initial_content, initial_tag ]
promise
    .then((new_content, new_tag) => { ... })
    .catch(error => { ... })

file.watch((content, tag, [error]) => { }, [ { read: boolean } ])

file.close()
Simple reading and writing
You can read a file with code like this:
cockpit.file("/path/to/file").read()
    .then((content, tag) => {
        ...
    })
    .catch(error => {
        ...
    });
It is recommended to use absolute paths. Relative paths are resolved
against /. To work with the current user’s files
cockpit.user() can be used to get the user’s home
directory.
The read() method returns a
Promise.
When successful, the promise will be resolved with the content of the
file. Unless you specify options to change this (see below), the file is
assumed to be text in the UTF-8 encoding, and content will be a
string.
The tag that is passed to the then() callback is a short string that
is associated with the file and changes whenever the content of the file
changes. It is meant to be used with replace().
It is not an error when the file does not exist. In this case, the
then() callback will be called with a null value for content
and tag is "-".
The superuser option can be used the same way as described in the
cockpit.channel() to provide a different
access level to the file.
You can use the max_read_size option to limit the amount of data
that is read. If the file is larger than the given number of bytes, no
data is read and the channel is closed with problem code too-large.
The default limit is 16 MiB. The limit can be completely removed by
setting it to -1.
To write to a file, use code like this:
cockpit.file("/path/to/file").replace("my new content\n")
    .then(tag => {
        ...
    })
    .catch(error => {
        ...
    });
The replace() method returns a
Promise.
When the promise is resolved, the file has been atomically replaced (via
the rename() syscall) with the new content. As with read(), by
default the new content is a string and will be written to the file as
UTF-8. The returned tag corresponds to the new content of the file.
When the promise is rejected because of an error, the file or its meta data has not been changed in any way.
As a special case, passing the value null to replace() will
remove the file.
The replace() method can also check for conflicting changes to a
file. You can pass a tag (as returned by read() or replace()) to
replace(), and the file will only be replaced if it still has the
given tag. If the tag of the file has changed, replace() will fail
with an error object that has error.problem == "change-conflict".
See modify() below for a convenient way to achieve transactional
updates to a file.
File format
By default, a file is assumed to be text encoded in UTF-8, and the
read() and replace() functions use strings to represent the
content.
By specifying the syntax.parser() and syntax.stringify()
options, you can cause read() to parse the content before passing it
back to you, and replace() to unparse it before writing.
The main idea is to be able to write { syntax: JSON }, of course,
but you can easily pass in individual functions or make your own
parser/unparser object:
cockpit.file("/path/to/file.json", { syntax: JSON })

var syntax_object = {
    parse:     my_parser,
    stringify: my_unparser
};

cockpit.file("/path/to/file", { syntax: syntax_object })
Any exceptions thrown by the parse() and stringify() functions
are caught and reported as read or write errors.
The null value that is used to represent the content of a
non-existing file (see "Simple reading and writing", above) is not
passed through the parse() and stringify() functions.
Binary files
By default the content of the file is assumed to be text encoded as
UTF-8 and it can not contain zero bytes. The content is represented as a
JavaScript string with read(), replace(), etc. By setting the
binary option to true when creating the proxy, no assumptions are
placed on the content, and it is represented as a Uint8Array in
JavaScript.
Atomic modifications
Use modify() to modify the content of the file safely. A call to
modify() will read the content of the file, call callback on the
content, and then replace the content of the file with the return value
of the callback.
The modify() method uses the read() and replace() methods
internally in the obvious way. Thus, the syntax.parse() and
syntax.stringify() options work as expected, null represents a
non-existing file, and the watch callbacks are fired.
It will do this one or more times, until no other conflicting changes have been made to the file between reading and replacing it.
The callback is called like this
new_content = callback (old_content)
The callback is allowed to mutate old_content, but note that this
will also mutate the objects that are passed to the watch callbacks.
Returning undefined from the proxy is the same as returning
old_content.
The modify() method returns a
Promise.
The promise will be resolved with the new content and its tag, like so
function shout(old_content) {
    return old_content.toUpperCase();
}

cockpit.file("/path/to/file").modify(shout)
    .then((content, tag) => {
        ...
    })
    .catch(error => {
        ...
    });
If you have cached the last content and tag results of the read() or
modify() method, or the last values passed to a watch callback, you
can pass them to modify() as the second and third argument. In this
case, modify() will skip the initial read and start with the given
values.
Change notifications
Calling watch() will start monitoring the file for external changes.
handle = file.watch(callback);

handle_no_read = file.watch(callback, { read: false });
Whenever a change occurs, the callback() is called with the new
content and tag of the file. This might happen because of external
changes, but also as part of calls to read(), replace(), and
modify().
When a read error occurs, the callback() is called with an error as
a third argument. Write errors are not reported via the watch callback.
Calling watch() will also automatically call read() to get the
initial content of the file. Thus, you normally don’t need to call
read() at all when using watch().
To disable the automatic reading, e.g. for large files or unreadable
file system objects, set the read option to false. The first
content argument of the callback will then always be null.
To free the resources used for monitoring, call handle.remove().
file.path
A string containing the path that was passed to the cockpit.file()
method.
Closing
Call the close() method on a file proxy to cancel all ongoing
operations, such as reading, writing, and monitoring. The proxy should
not be used after closing it.
cockpit.js: HTTP Client
Cockpit allows access to local HTTP and REST services via this API.
cockpit.http()
http = cockpit.http(endpoint, [options])
http = cockpit.http(options)
Create a new HTTP client. The endpoint can be a file path starting
with / to connect to a unix socket, or it can be a port number to
connect to. The optional options argument is a javascript plain
object, and may include:
"address"-
Connect to an address other than localhost. Must be a valid host name or IP address. To use this option you also must provide a port number.
"port"-
Port number to use with "address" option, when not given in
endpoint. "tls"-
Object properties for an https connection. See
http-stream2 TLS options. "headers"-
Additional HTTP headers to include with the HTTP request. This is a plain javascript object with each key as a header name, and each value as the header value.
"superuser"-
Set to
"require"to open this channel as root. If the currently logged in user is not permitted to become root (eg: viapkexec) then thechannelwill immediately be closed with a"access-denied"problem code. + Set to"try"to try to make the request as root, but if that fails, fall back to perform an unprivileged request. "tls"-
If set to a plain javascript object, then the connection will be an HTTPS connection and include TLS encryption. The fields of the
tlsobject declare various TLS configuration and data. All fields are optional: +-
"authority": Certificate authority(s) to expect as signers of the server’s TLS certificate, represented as a plain javascript object. It should have either a"file"field containing a readable PEM file on the system containing authorities, or a"data"with PEM encoded certificate data. -
"certificate": A client certificate to use, represented as a plain javascript object. It should have either a"file"field containing a readable PEM file on the system to use as a certificate, or a"data"with PEM encoded certificate data. -
"key": A client key to use, represented as a plain javascript object. It should have either a"file"field containing a readable PEM file on the system to use as a key, or a"data"with PEM encoded key data. -
"validate": A boolean that describes whether to validate the server’s TLS certificate or not. By default local connections are not validated, and remote connections are validated.
-
Here is a somewhat complex example of using most of the above
options when when calling cockpit.http():
http = cockpit.http({
    "address": "localhost",
    "headers": {
        "Authorization": "Basic dXNlcjpwYXNzd29yZA=="
    },
    "port": 443,
    "tls": {
        "validate": true,
        "authority": {
            "file": "/etc/pki/tls/certs/ca-bundle.crt",
        },
        "certificate": {
            "data": "-----BEGIN CERTIFICATE-----\nMIIDsDCCA..."
        },
        "key": {
            "data": "-----BEGIN RSA PRIVATE KEY-----\nMIIEogIBA..."
        }
    }
});
http.get()
request = http.get(path, [params, [headers]])
Perform an HTTP GET request for the given path. If the params is
specified it should be a plain javascript object, which will be turned
into a query string.
Optionally a plain javascript object containing headers can be included
in the headers argument.
The return value is a Promise that will complete if the request happens successfully, or fail if there’s a problem.
http.post()
request = http.post(path, body, [headers])
Perform an HTTP POST request for the given path. The body can be
a string, or a javascript plain object, which will be encoded as JSON
data. If body is undefined or null then an empty HTTP body
will be sent.
Optionally a plain javascript object containing headers can be included
in the headers argument.
The return value is a Promise that will complete if the request happens successfully, or fail if there’s a problem.
http.request()
request = http.request(options)
Perform an HTTP request. The options can contain the following:
"body"-
The HTTP request body. If you do not specify a body, then you must call request.input() to complete the body and allow the request to start.
"headers"-
A javascript plain object containing HTTP headers.
"method"-
The HTTP method. Defaults to
"GET". "params"-
A javascript plain object containing query string parameters.
"path"-
The HTTP path. Defaults to
/.
The return value is a Promise that will complete if the request happens successfully, or fail if there’s a problem.
request.then()
request.then(data => { ... })
This is a standard Promise method. It sets up a handler to be called when the request finishes successfully.
The data argument contains the body result of the request. If it a
string, unless the process was opened in binary mode, in which case the
data is an array of bytes. If a request.stream() handler is set
up, then any standard output data consumed by the handler will not be
included in the data argument.
request.catch()
request.catch((exception[, data]) => { ... })
This is a standard Promise method. It sets up a handler to be called when the request fails, or returns an error code.
The exception object passed to the handler can have the following
fields:
problem-
A problem code string when a problem occurred starting or communicating with the server. This is
nullif the process exited or was terminated. status-
The numeric status of the response. This is
nullif no response was received. reason-
A string reason returned in the response. This is
nullif no response was received. message-
A string message returned in the response. This is
nullif no response was received.
If the request returned a response body, it will be available in the
data argument. Otherwise this argument will be undefined.
request.response()
request.response((status, headers) => { ... })
This sets up a handler to be called when the HTTP request gets the
initial response from the server. The status argument is the HTTP
status integer, and the headers is a plain javascript object
containing the headers of the response.
request.stream()
request.stream(data => { ... })
This sets up a handler to be called when the request returns output data. The handler will be called multiple times.
Only one handler may be registered at a time. Registering an additional
handler replaces the previous one. The handler receives either string
data or an array of binary bytes as its argument. A stream handler
may return a number, which indicates the number of characters or bytes
consumed from data. Any data not consumed will be included again the
next time the handler is called.
If a request.stream() handler is set up, then the request.then()
handlers will only get any remaining data not consumed by the stream
handler.
request.input()
request.input(data, [stream])
This method writes data to the HTTP request body. It is only valid
if no "body" has been specified in
http.request() options. If stream is
true then this function can be called again to provide further data.
request.close()
request.close([problem])
Cancel the request. If problem is specified it should be a standard
problem code string.
http.close()
http.close([problem])
Cancel all outstanding requests with the given problem code. This is useful when you know that the server is going down soon.
cockpit.js: Localization
Cockpit provides a gettext()
like API for easy translation of strings.
cockpit.language
The current locale language code. This is set based on the
cockpit.locale() data loaded.
cockpit.locale()
cockpit.locale(po)
Load locale information for a given po data. The data should be JSON
data in the po2json format. The
data will be loaded globally. If po data has already been loaded,
then this will extend that loaded data with additional strings. Any
identical translations strings will be replaced with the new strings. A
null argument clears all the locale information previously loaded.
Various methods such as
cockpit.gettext() make use of the
loaded data.
cockpit.gettext()
translated = cockpit.gettext([context], string)
var _ = cockpit.gettext
var C_ = cockpit.gettext
translated = _("string")
translated = C_("context", "string")
Lookup string for translation in the loaded locale data. The
translated string will be returned, or string will be returned if no
such translated string is present. The context argument is an
optional string used to qualify the string.
This function can be assigned to a variable called _ (underscore)
which will make your code work with the typical _("string") syntax.
cockpit.noop()
var N_ = cockpit.noop
var NC_ = cockpit.noop
A noop function suitable for assigning to N_ or NC_ so that
gettext scanners will be able to find translatable strings. More
specifically this function returns its last argument.
cockpit.ngettext()
translated = cockpit.ngettext([context], string1, stringN, number)
Lookup a string appropriate for a pluralization form of the number.
Various languages have complex pluralization forms that go far between
the singular and plural forms speakers of English are familiar with. If
no such translated string is found then either one of string1 or
stringN is returned according to simple pluralization rules.
The context argument is an optional string used to qualify the
string.
cockpit.translate()
cockpit.translate()
cockpit.translate(element, ...)
cockpit.translate(selection)
The document will be scanned for translate tags and they will be
translated according to the strings in loaded locale data. One or more
element arguments may be specified. These are DOM elements for
specific parts of the document to be translated. If no element is
specified then the entire document is translated.
If an array or array-like object is passed as a selection then all
DOM elements in the array will be treated as parts of the document to be
translated.
cockpit.js: Page Location and Jumping
Page location and navigation between components
Page location
location = cockpit.location
cockpit.location = "/path"
Cockpit components often have different views, without changing the HTML
file that is being viewed. These are known as pages.
cockpit.location is an object that can be used to read the current
page and to navigate to a different page location. It works by updating
window.location.hash.
The cockpit.location looks like a HTTP path with a possible query
string:
/path/sub/page?option=value,option2
The location.path and
location.options contain a parsed
form of the location. While the location cannot be modified in place, a
new one can be created by assigning a string to cockpit.location or
by calling the location.go() function.
cockpit.location is designed similarly to window.location in
that the location object is preplaced whenever the current page location
changes. To be aware of when the page location changes listen for the
cockpit.onlocationchanged event.
Using the location object as a string will result in the
location.href.
location.href
The string representation of this page location, including any options.
location.path
An array of path segments, parsed and decoded appropriately. An empty array denotes the root path.
location.options
A javascript object containing the various options present in the location.
If an option appears more than once, its value will be an array.
location.go()
location.go(path, [options])
Changes the current location to the given path and options. If
the path argument is a string, it will be parsed into a path. If it
is a relative path, then the result will be relative to the current
location.path. If the path argument is an array of path
segments, it will be treated as a full parsed absolute path.
Any options found in a path will be added to those in the optional
options argument, and used in the result.
The location change will only take effect if the location has not
changed in the meantime. This can be to good effect by saving a
cockpit.location object and doing a conditional navigation, by
calling the saved location.go() method later. This will only
navigate if the user or other code has not navigated in the meantime.
location.replace()
location.replace(path, [options])
Similar to location.go() except the
location change will not result in a navigation change in the browser’s
history.
location.decode()
path = location.decode(href, [options])
Decode a cockpit href into its path array. If the options
argument is specified, then it will be populated with options found in
the href.
If href is a relative path it will be resolved relative to
location.href.
location.encode()
href = location.encode(path, [options])
Encode the given path and options into a cockpit href. The
path argument may be an array of path segments, or a string path. If
a relative path is passed, it will be resolved relative to
location.href.
cockpit.onlocationchanged
cockpit.addEventListener("locationchanged", function() { ... })
An event emitted when over the cockpit.location changes. Typically a
component reacts to this event by updating its interface to reflect the
new cockpit.location.path and
cockpit.location.options.
This event is not triggered immediately during a location.go() or
similar call. It will be triggered asynchronously at a later time.
Jumping between components
cockpit.jump("/system/log")
In Cockpit in there multiple components shown. In order to tell Cockpit
to jump to and show another component and a certain location within that
component, use the cockpit.jump() function. Stable component paths
are documented. Don’t assume you can navigate into paths that are not
stable API.
cockpit.jump()
cockpit.jump(path, [ host ])
Ask Cockpit to jump to another component. The location of the current
component will not be affected. The path argument can be a string
path, starting with / or an array containing the parts of a path
that will be joined to create a path. If host is not specified, then
the component on the same host as the caller will be displayed. If host
is null, then the host portion of the path will be removed, displaying
the component on the host that cockpit is connected directly to.
If the calling component is not running within Cockpit, or the calling component is not currently displayed, then the jump will not happen, and this function has no effect.
cockpit.hidden
A boolean property that indicates if the current component page is
visible or hidden. When the code or user jumps to another component, the
prior one remains loaded and initialized but is hidden. Use this
property together with the
cockpit.onvisibilitychange
event to decide whether or not to perform expensive tasks to update the
interface.
This property is analogous to the document.hidden page visibility
API, but works with the document and frame implementation of Cockpit.
cockpit.onvisibilitychange
cockpit.onvisibilitychange = function() { ... }
This event is emitted when the
cockpit.hidden property changes. This
event is similar to the document.onvisibilitychange API, but works
with the document and frame implementation of Cockpit.
cockpit.js: User Session
User information and login session state
cockpit.logout()
cockpit.logout([reload])
Logout of Cockpit. Unless reload is false this will also cause
the page to be reloaded, so that the user can see the logged out state.
cockpit.user()
var promise = cockpit.user();
promise.then(user => { ... });
This object contains information about the user that’s currently logged into cockpit. The following fields are defined:
"id"-
This is unix user id.
"gid"-
This is unix user group id.
"name"-
This is the unix user name like
"root". "full_name"-
This is a readable name for the user.
"groups"-
This is an array of group names to which the user belongs. Since version 318, the first item in this list is the primary group.
"home"-
This is user’s home directory.
"shell"-
This is unix user shell.
Returns a promise that completes once the user information is available.
|
Warning
|
|
Permission lookup
Cockpit provides a mechanism for checking if the current user satisfies a given criteria. This is meant for updating UI elements based on what actions the user can perform. It is not an access control mechanism.
cockpit.permission()
permission = cockpit.permission([options])
Create a new permission object to check if the current user has a
particular permission specified by options:
admin: true-
True if the session has superuser privileges, i.e. can run channels as root with
{ superuser: "require" }. group:name-
True if the currently logged user is a member of group name.
The permission result is always true for the "root" user. When
options is not given, check if the current user is root.
permission.allowed
A boolean value which indicates if the permission is allowed or not.
This will be null if the permission is unknown, or there was an
error checking the permission or the permission data has not yet loaded.
This property will update asynchronously and if you wish to be notified
of changes connect to the
permission.onchanged event.
permission.onchanged
permission.addEventListener("changed", function() { ... })
This event is fired when the permission changes. In particular the permission.allowed property.
permission.close()
permission.close()
Closes the permission object and tears down any registered callbacks and dbus subscriptions.
cockpit.js: Manifests
Loading Manifests
For a convenient access to all page manifests, include
<script src="../manifests.js"></script> into your page to register
the manifests at the cockpit.manifests global variable.
You can also load ../manifests.json directly in your page, with
fetch().
cockpit.js: Metrics
Metrics about the system can be retrieved from several sources using
cockpit.metrics() metrics channels. The
metrics are made available as series data, and can be used with the
cockpit.series() and
cockpit.grid() facilities.
cockpit.metrics()
metrics = cockpit.metrics(interval, options, cache)
Opens a new metrics channel. The data retrieved will be available in the
metrics.series series sink, and can be
used together with cockpit.grid() objects.
The interval is in milliseconds, and is the granularity of the
series data retrieved. Any grids consuming the data must have the same
interval.
The cache argument is a cache identifier. If specified, then this
metrics channel will share data with other metrics channels of the same
identifier. Make sure to use a globally unique string.
The options argument is either a javascript plain object, or an
array of those. Each object can have the following fields.
"metrics"-
An array of full metric descriptions, as javascript objects. The specifics of these, and how to determine which ones to use, can unfortunately only be found in the low-level protocol documentation. This option is required.
"source"-
The source to use for real-time data. This is used by the
followmethod, see below. Set to"internal"to retrieve internal metrics read by the bridge. If set to"direct"or"pmcd"then data will be retrieved from PCPif it is available. The default is"internal". "archive_source"-
The source to use for retrieving historical data. This is used by the
fetchmethod, see below. Set to"pcp-archive"to retrieve data from PCP archives. The default is not to try to retrieve historical data.
When the options argument is an array of javascript objects, then
the metrics channel tries to use them in order until one succeeds. This
way, you can prefer PCP as the source but fall back to internal metrics
when PCP is not available, for example. The channel gives no indication
which of the options has been used, and fetch and follow might
use different entries from the list.
metrics.fetch()
metrics.fetch(beg, end)
Retrieve archived metrics data between beg and end. The
arguments can either be numbers, in which case they are interval based
offsets, or they can be javascript Date objects.
metrics.follow()
metrics.follow()
Start retrieving live metrics data as it become available.
metrics.close()
metrics.close()
Stop the retrieval of metrics and release resources.
metrics.series
The series sink where data retrieved data will be processed.
metrics.meta
The metrics meta data last received.
metrics.onchanged
metrics.onchanged = function() { }
An event triggered when one of the properties on this metrics object changes.
cockpit.js: Series Data
Series data consists of values along a continuous (usually time) axis. We can place these in grids which expose a distinct subset of these values. These are the underlying mechanism for displaying metrics data in graphs.
cockpit.grid()
grid = cockpit.grid(interval, [beg, end])
Creates a grid object to contain series data.
The interval is the granularity of the grid. Usually this is a
number of milliseconds, when used with time series data. The beg and
end are the bounds of the grid. If omitted they will be set to zero
for an initially empty grid.
If beg and/or end are negative (including negative zero) then
they are interpreted in number of intervals relative to the current
time. Thus cockpit.grid(1000, -300, -0) will create a grid for the most
recent 5 minutes.
grid.add()
row = grid.add(series, path)
row = grid.add(callback, [early])
row = grid.add()
Adds a row to the grid. The returned row is a Javascript array that
will contain series data. The arguments control how the row is populated
from the series data. The row is a sparse array. Its row.length
will not match the expected size of the grid, unless and until the row
has been completely filled in. The first index of the row will
contain the data from the series data at the
grid.beg offset.
When no arguments are passed, an empty row is added, and it is not populated with data.
When called with a series and path argument then the row will be
populated directly with series data. The series can either be a
series object or an object that has an
obj.series property. The series
interval must match the interval of this grid. If path is missing
or empty, then the series data is placed into the row directly.
Otherwise path indicates which part of the series data to place in
the row. When path is an array, it is used as a set of property
names or array indexes to follow into nested series data. When path
is a dotted string, it is split and used the same way to locate the
correct value in nested series data. The exact format of the series data
depends on its producer, and relevant paths will be documented there.
If a callback function is specified, then it will be invoked to
provide series data for the row. The function is invoked as
callback(row, index, count), where the row is the row to fill
in, the index is the index to start filling in and count is the
number of items to fill in. The this variable will be set to the
grid while invoking the callback. The callback is called after other
data rows for a given series have been filled in. Callbacks are called
in the order added, unless the early argument is set to true, in
which case the callback is called earlier than callbacks without the
early argument set.
To remove the row use the grid.remove()
method.
The row will start being populated with data when the series
produces data. To make this happen right away, use the
grid.sync() method.
grid.remove()
grid.remove(row)
Remove a previously added row from the grid. The row will no longer
be updated with series data.
grid.sync()
grid.sync()
Load or reload data from the series into the rows. This does not clear
the rows before populating them. Some data may be populated immediately,
others may have to wait until data can be loaded. Internally this
function calls series.load() for each
series.
All rows with callbacks will be invoked to regenerate all the data. The
grid.onnotify event will be triggered.
It is not necessary to call this function after a call of the
grid.move() method.
grid.move()
grid.move(beg[, end])
Move the grid to new beg and end range. Data will be discarded
from the rows and grid.sync() will be
called to load or reload series data for the new range of offsets.
If end is not specified it will be set to beg. If beg and/or
end are negative (including negative zero) then they will be set to
the number of intervals prior to the current time taken as an interval.
If beg and/or end are negative (including negative zero) then
they are interpreted in number of intervals relative to the current
time. Thus cockpit.grid(1000, -300, -0) will create a grid for the most
recent 5 minutes.
grid.walk()
grid.walk()
Move the grid forward every
grid.interval milliseconds. To stop
moving forward, call grid.move().
grid.notify()
grid.notify(index, count)
This function is called to have rows with callbacks recalculate their
data. It is not normally necessary to call this function, as it will be
invoked automatically when new series data is available or has been
loaded. This function triggers the
grid.onnotify event.
grid.onnotify
grid.addEventListener("notify", function(index, count) { ... });
An event that is triggered when some part of the series data in grid
changes. The index is the row index where things changed, and the
count is the length of the data that changed.
grid.close()
grid.close()
Close the grid, and stop updating the rows.
grid.interval
grid.beg
The beginning offset of the series data in the grid. Do not set this property directly. Use the grid.move() method instead.
grid.end
The ending offset of the series data in the grid. Do not set this property directly. Use the grid.move() method instead.
cockpit.series()
series = cockpit.series(interval, [cache, fetch])
Create a new sink of series data. This is usually done by producers of series data, and it is rare to invoke this function directly.
The interval is the granularity of the series data. For time series
data this is an interval in milliseconds. If a cache string is
specified, series data will be cached across frames for series with the
same cache cache identifier to load and/or reload.
If a fetch callback is specified, then it will be invoked when grids
request certain ranges of data. The fetch callback is invoked with
function fetch(beg, end) { ... } range offsets. The
series.input() should be called with data
retrieved, either immediately or at a later time. The callback may be
called multiple times for the same ranges of data. It is up to the
callback to determine when or whether it should retrieve the data more
than once.
A producer of series data, usually calls this function and creates
itself a obj.series property containing this series object.
series.input()
series.input(beg, items[, mapping])
Send series data into the series sink. Any grids that have added rows
based on this series, will have data filled in. The beg is the
beginning offset of items. The items are an array one or more
series data items.
Producers may wish to provide additional properties that can be used in
lookup paths that rows can pull from. This is done in the mapping
argument. If specified it is a tree of objects. Each sub object should
have a property with the name "" empty string, which will be used as
the property name or index in place of the one used in the lookup path.
series.load()
series.load(beg, end)
Load data from the series into any grids that have rows based on this series data. Any cached data will be filled in immediately. Any data not cached, will be requested from the producer, if possible, and may arrive at a later time.
The beg and end denote the range of data to load.
series.interval
series.limit
The maximum number of items to cache for loading and/or reloading. You
can change this value to a different number. Having a number close to
zero will break certain usage of grids, such as
grid.walk().
cockpit.js: Spawning Processes
This is the API for spawning a process and receiving its output, as well as exit codes.
cockpit.spawn()
process = cockpit.spawn(args, [options])
Spawns a process on the system.
The args should be an array starting with the executable and
containing all the arguments to pass on the command line. If args is
a string then it is interpreted as an executable name. The optional
options argument is a javascript plain object and can contain any of
the following fields:
"binary"-
If set to
truethen handle the input and output of the process as arrays of binary bytes. "directory"-
The directory to spawn the process in.
"err"-
Controls where the standard error is sent. By default it is logged to the journal. If set to
"out"it is included in with the output data. If set to"ignore"then the error output is discarded. If set to"message", then it will be returned as the error message. When the"pty"field is set, this field has no effect. "environ"-
An optional array that contains strings to be used as additional environment variables for the new process. These are
"NAME=VALUE"strings. "pty"-
Launch the process in its own PTY terminal, and send/receive terminal input and output.
"batch"-
Batch data coming from the process in blocks of at least this size. This is not a guarantee. After a short timeout the data will be sent even if the data doesn’t match the batch size. Defaults to zero.
"latency"-
The timeout for flushing any cached data in milliseconds.
"superuser"-
Set to
"require"to spawn the process as root instead of the logged in user. If the currently logged in user is not permitted to become root (eg: viapkexec) then theclientwill immediately be closed with a"access-denied"problem code. + Set to"try"to try to run the process as root, but if that fails, fall back to an unprivileged process.
The spawned process is a promise that will complete if the process exits successfully, or fail if there’s a problem. Some additional methods besides the standard promise methods are documented below.
The standard output of the process is made available via the spawned process object. Any non-UTF8 output from the process will be coerced into textual form. It is highly recommended that only textual output be produced by the command. The standard error is logged to the journal.
cockpit.script()
process = cockpit.script(script, [args], [options])
Run a shell script on the system.
This function spawns a Bourne shell script
process. The full text of the /bin/sh shell script should be passed
in as the first argument. The args can be an array of arguments, not
including the executable, which are passed to the script as $1,
$2 and so on. Shebang options are not used or respected.
The options is an optional javascript plain object and can include
any of the fields listed for the
cockpit.spawn() function.
The spawned process is a promise that will complete if the script exits successfully, or fail if there’s a problem. Some additional methods besides the standard promise methods are documented below.
The standard output of the process is made available via the spawned process object. Any non-UTF8 output from the process will be coerced into textual form. It is highly recommended that only textual output be produced by the command. The standard error is logged to the journal by default.
process.then()
process.then((data[, message]) => { ... })
This is a standard promise method. It sets up a handler to be called when the process finishes successfully.
The data argument contains the standard output of the process. If it
a string, unless the process was opened in binary mode, in which case
the data is an array of bytes. If a process.stream() handler is
set up, then any standard output data consumed by the handler will not
be included in the data argument.
If the process was spawned with the "err" option set to
"message" then the second argument will contain the standard error
output of the process.
process.catch()
process.catch((exception[, data]) => { ... })
This is a standard Promise method. It sets up a handler to be called when the process fails, terminates or exits.
The exception object passed to the handler can have the following
fields:
message-
A message describing the exception. If the process was spawned with the
"err"option set to"message"then the second argument will contain the standard error output of the process. problem-
A problem code string when a problem occurred starting or communicating with the process. This is
nullif the process exited or was terminated. exit_status-
The numeric exit status of the process. This is
nullif the process did not exit. exit_signal-
A string representing a unix signal that caused the process to terminate. This is
nullif the process did not terminate because of a signal.
If the process actually ran and produced output before failing, it will
be available in the data argument. Otherwise this argument will be
undefined.
process.stream()
process.stream(data => { ... })
This sets up a handler to be called when the process has standard output. The handler will be called multiple times. The handler will be called regardless of whether the process ends up exiting successfully or not.
Only one handler may be registered at a time. Registering an additional
handler replaces the previous one. The handler receives either string
data or an array of binary bytes as its argument. A stream handler
may return a number, which indicates the number of characters or bytes
consumed from data. Any data not consumed will be included again the
next time the handler is called.
If a process.stream() handler is set up, then the process.then()
handlers will only get any remaining data not consumed by the stream
handler.
process.input()
process.input(data, [stream])
This method writes data to the standard input of the process. If
data is null or undefined it is not sent. The data
should be a string or an array of bytes if the process was opened in
binary mode.
If stream is set to true then this function may be called again
with further input. Otherwise the standard input of the process is
closed.
process.close()
process.close([problem])
Close the process by closing its standard input and output. If
problem is specified it should be a standard
problem code string. In this case the process
will be terminated with a signal.
cockpit.js: Utilities
Various utility functions
cockpit.format()
string = cockpit.format(template, args)
string = cockpit.format(template, [arg, ...])
Format a string interpolating args into template using shell
like syntax. The args may be either an array or javascript object.
The template can contain fields that look like $name or
${name} or $0. Numeric fields are used with array args and
start at zero.
In the second form, multiple arg arguments may be passed directly,
and interpolated as as numeric fields in the template.
All falsy arguments except the numbers 0 and `0.0`are replaced by
an empty string.
cockpit.format_number()
string = cockpit.format_number(number, [precision])
Formats number into a displayable string. If the number is not
an integer, it is rounded to the given number of decimal places,
defaulting to 3. If the number is near zero, but not quite zero it is
rounded to the smallest non-zero value of the given precision; i.e.
±0.001 for default precision 3.
If number is null or undefined an empty string will be
returned.
cockpit.format_bytes()
string = cockpit.format_bytes(number, [options])
Formats number into a displayable string with a suffix, such as
kB or MB.
By default, SI units are used. IEC units (1024-based) can be requested
by including base2: true in options.
By default, non-integer numbers will be formatted with 3 digits of
precision. This can be changed with options.precision.
If number is null or undefined an empty string will be
returned.
cockpit.format_bytes_per_sec()
string = cockpit.format_bytes_per_sec(number, [options])
Format number of bytes into a displayable speed string.
This function is mostly equivalent to cockpit.format_bytes() but the
returned value contains a unit like kB/s or MB/s.
cockpit.format_bits_per_sec()
string = cockpit.format_bits_per_sec(number, [options])
Format number of bits into a displayable speed string.
This function is mostly equivalent to cockpit.format_bytes() but the
returned value contains a unit like kbps or Mbps.
This function does not support IEC units. base2 may not be passed as
part of options.
cockpit.init()
await cockpit.init();

cockpit.init().then(() => { ... });
Requests initialization of the Cockpit client library. This will ensure
that the transport is connected and we are ready to create channels. It
also populates the cockpit.info field.
This function returns a promise. Initialization isn’t complete until the
promise has resolved. You can either await it or call .then() on
it.
cockpit.info
cockpit.info.channels[payload]

cockpit.info.os_release[field]

cockpit.info.user

cockpit.info.ws.version
This object contains information about Cockpit itself. It is only available after cockpit.init() has been called and awaited.
channels-
This is a mapping of channel payload types (keys, strings) supported by the bridge to capabilities advertised by those channels (values, lists of strings). Channels are listed even if they don’t advertise any capabilities, making this useful as a way to determine which channel types are supported by the bridge.
os_release-
This is the data from the
/etc/os-releaseor/usr/lib/os-releaseon the system that the bridge is running on. It is a mapping from the key names to their values. See the os-release Specification for information about the available keys. user-
Contains information about the user we’re logged in as.
uid-
This is unix user id as an integer.
gid-
This is unix user group id as an integer.
name-
This is the unix user name like
"root". fullname-
This is a readable name for the user, from the GECOS field.
group-
This is the primary group name of the user.
groups-
This is an array of group names to which the user belongs. The first item in this list is the primary group.
home-
This is user’s home directory.
shell-
This is unix user shell.
ws-
Contains information about the webserver Cockpit is being served with.
version-
The version of the webserver.
cockpit.event_target
cockpit.event_target(object, [handlers])
Adds an
EventTarget
implementation to the object. Optionally store the handlers in
handlers if its specified.
API: shell
This package contains the shell that loads other components.
index.html
<iframe src="http://127.0.0.1:9090/cockpit+app/@localhost/shell/index.html"
    width="600" height="400"></iframe>
This is a Cockpit component that provides an interface to configure a single machine. It loads other components on demand to make that happen.
- Component URL
-
/cockpit+app/@localhost/shell/index.html
API: system
This package contains general components for basic control of a system.
logs.html
System log component
Description
<iframe src="http://127.0.0.1:9090/cockpit+app/@localhost/system/logs.html"
    width="600" height="400"></iframe>
This is a Cockpit component that brings up system log viewer, with filtering capabilities. On systemd based systems this displays the entries from journal.
- Component URL
-
/cockpit+app/@localhost/system/logs.html - Filter by priority
-
#?prio=notice
Filters the log to show entries below the specific priority, inclusive. These priorities are syslog level keywords. Specifying*as a priority will show all available entries. The default priority iserr. - Filter by service
-
#?service=sshd.service
Filters the log to show entries related to the specific service. The format of the service is specific to the logging implementation. For journald these are systemd service unit names. - Filter by tag
-
#?tag=kernel
Filters the log to show entries related to the specific syslog identifier. - Filter by message
-
#?grep=
Filters the log to show entries where theMESSAGE=field matches the specified regular expression. PERL-compatible regular expressions are used. If the pattern is all lowercase, matching is case insensitive. Otherwise, matching is case sensitive. - Filter by any field
-
#?FIELD=VALUE
A field is referring to the components of a structured journal entry. The match must be exact. Value can be comma separated list in which case they are automatically matched as alternatives. - Start at point
-
#?start=boot
Filters the log to show entries after the specific point in time. Valid values areboot(since last boot),last-24h(last 24 hours),last-week(last seven days) andprevious-boot(previous boot). - Follow the journal
-
#?follow=true
Keep listening on new entries. Valid values aretrue(follow) andfalse(do not follow). - Show log entry
-
#/6e272d82993c4e0d...
To show a specific log entry, put the log entry cursor in a path after the hash above. Note that cursors are logging system specific, and journal cursors are subject to change.
terminal.html
Server terminal component
Description
<iframe src="http://127.0.0.1:9090/cockpit+app/@localhost/system/terminal.html"
    width="600" height="400"></iframe>
This is a Cockpit component that brings up a web-based terminal for the logged in user.
- Component URL
-
/cockpit+app/@localhost/system/terminal.html